![https://hicoldcat.oss-cn-hangzhou.aliyuncs.com/img/20220720214248.png https://hicoldcat.oss-cn-hangzhou.aliyuncs.com/img/20220720214248.png]()
背景
当网络最初开始时,你在网上探索信息的唯一方法是输入IP地址。此后,DNS的概念被引入,帮助我们将域名与IP地址联系起来。
因此,只要你输入hicoldcat.com,DNS就会负责将其翻译成相应的IP,这就是计算机最终理解的内容。
什么是 ENS?
-
ENS 即The Ethereum Name Service,它与DNS在web2空间的行为非常相似。
-
我们都知道,以太坊的地址很长,很难记住或输入。
-
ENS通过将这些钱包地址、哈希值等翻译成可读域,然后保存在以太坊区块链上,解决了这个问题
-
ENS最好的部分是,与集中式的DNS服务器不同,ENS在智能合约的帮助下工作,具有抗审查能力。
-
因此,现在当你向某人发送你的钱包地址,看起来像0x1234huiahi….,你实际上可以向他们发送tom.eth,ENS会发现tom.eth实际上等于你的钱包地址(0x1234huiahi….)。
要求
是时候使用ENS开发一些东西了。
我们将开发一个网站,如果一个地址有ENS,它可以显示这个地址的ENS。
开始吧!
设置
- 首先让我们为你的地址取一个 ENS 名称,从打开https://app.ens.domains/开始
- 当你打开网站的时候,确保你的 MetaMask 已经连接到 Rinkeby 测试网络,并且它有一些 Rinkeby Ether
- 搜索一个 ENS 域名,任何你喜欢的名称,只要它是可用的!
- 点击
Available
![https://hicoldcat.oss-cn-hangzhou.aliyuncs.com/img/20220720215309.png https://hicoldcat.oss-cn-hangzhou.aliyuncs.com/img/20220720215309.png]()
- 然后点击
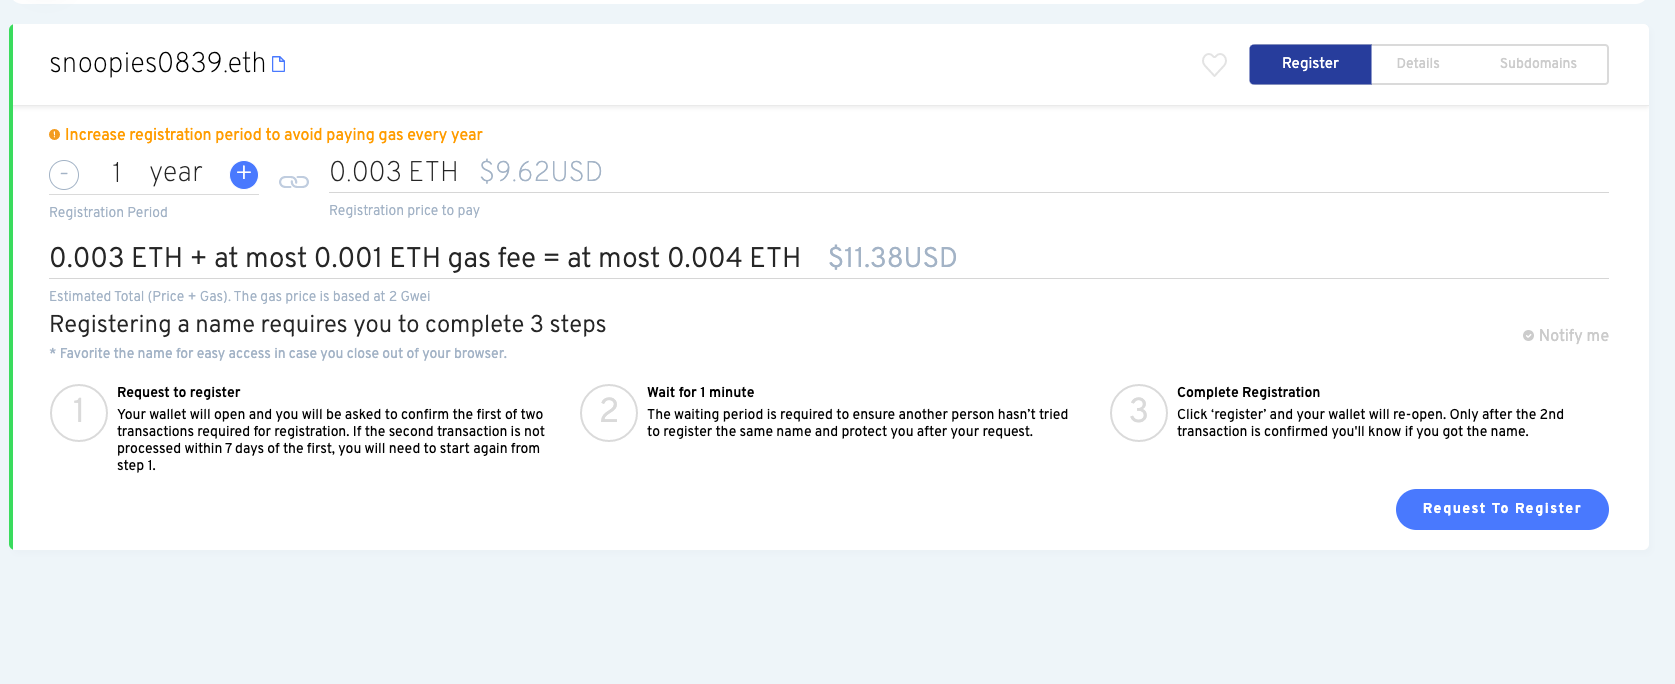
Request To Register 申请注册
![https://hicoldcat.oss-cn-hangzhou.aliyuncs.com/img/20220720215440.png https://hicoldcat.oss-cn-hangzhou.aliyuncs.com/img/20220720215440.png]()
![https://hicoldcat.oss-cn-hangzhou.aliyuncs.com/img/20220720215540.png https://hicoldcat.oss-cn-hangzhou.aliyuncs.com/img/20220720215540.png]()
![https://hicoldcat.oss-cn-hangzhou.aliyuncs.com/img/20220720215624.png https://hicoldcat.oss-cn-hangzhou.aliyuncs.com/img/20220720215624.png]()
![https://hicoldcat.oss-cn-hangzhou.aliyuncs.com/img/20220720215711.png https://hicoldcat.oss-cn-hangzhou.aliyuncs.com/img/20220720215711.png]()
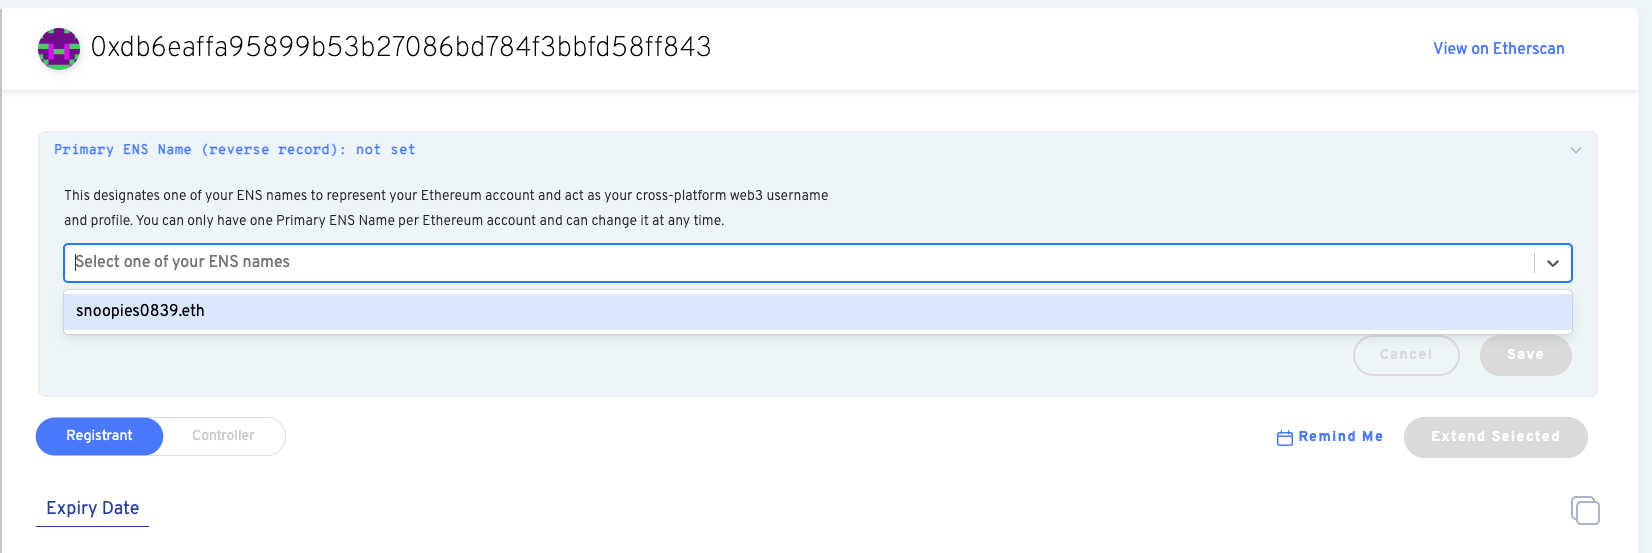
- 现在你在Rinkeby的地址上注册了一个ENS系统
牛逼,你做到了!
网站
- 要创建这个
next-app应用程序,在终端指向ENS文件夹并输入
1
|
npx create-next-app@latest
|
然后按回车键确认所有问题
1
2
|
cd my-app
npm run dev
|
-
现在进入 http://localhost:3000,你的应用程序应该正在运行
-
现在让我们安装 Web3Modal 库。Web3Modal 是一个易于使用的库,可以帮助开发人员轻松地允许用户使用各种不同的钱包连接到 dApps。默认情况下,Web3Modal Library 支持注入式提供者(Metamask、 Dapper、 Gnosis Safe、 Frame、 Web3 Browser 等)和 WalletConnect,你也可以轻松配置该库以支持 Portis、 Fortmatic、 Squarelink、 Torus、 Autherum、 D’cENT Wallet 和 Arkane。打开一个指向 my-app 目录的终端并执行以下命令
1
2
3
4
5
6
7
8
9
10
11
12
13
14
15
16
17
18
19
20
21
22
23
24
25
26
27
28
29
30
31
32
33
34
35
36
37
38
39
40
41
42
43
44
45
46
47
48
49
50
51
52
53
|
.main {
min-height: 90vh;
display: flex;
flex-direction: row;
justify-content: center;
align-items: center;
font-family: "Courier New", Courier, monospace;
}
.footer {
display: flex;
padding: 2rem 0;
border-top: 1px solid #eaeaea;
justify-content: center;
align-items: center;
}
.image {
width: 70%;
height: 50%;
margin-left: 20%;
}
.title {
font-size: 2rem;
margin: 2rem 0;
}
.description {
line-height: 1;
margin: 2rem 0;
font-size: 1.2rem;
}
.button {
border-radius: 4px;
background-color: blue;
border: none;
color: #ffffff;
font-size: 15px;
padding: 20px;
width: 200px;
cursor: pointer;
margin-bottom: 2%;
}
@media (max-width: 1000px) {
.main {
width: 100%;
flex-direction: column;
justify-content: center;
align-items: center;
}
}
|
- 在 page 文件夹下打开 index.js 文件并粘贴以下代码,代码说明可以在注释中找到。
 1
 2
 3
 4
 5
 6
 7
 8
 9
10
11
12
13
14
15
16
17
18
19
20
21
22
23
24
25
26
27
28
29
30
31
32
33
34
35
36
37
38
39
40
41
42
43
44
45
46
47
48
49
50
51
52
53
54
55
56
57
58
59
60
61
62
63
64
65
66
67
68
69
70
71
72
73
74
75
76
77
78
79
80
81
82
83
84
85
86
87
88
89
90
91
92
93
94
95
96
97
98
99
100
101
102
103
104
105
106
107
108
109
110
111
112
113
114
115
116
117
118
119
120
121
122
123
124
125
126
127
128
129
130
131
132
|
import Head from "next/head";
import styles from "../styles/Home.module.css";
import Web3Modal from "web3modal";
import { ethers, providers } from "ethers";
import { useEffect, useRef, useState } from "react";
export default function Home() {
// walletConnected keep track of whether the user's wallet is connected or not
const [walletConnected, setWalletConnected] = useState(false);
// Create a reference to the Web3 Modal (used for connecting to Metamask) which persists as long as the page is open
const web3ModalRef = useRef();
// ENS
const [ens, setENS] = useState("");
// Save the address of the currently connected account
const [address, setAddress] = useState("");
/**
* Sets the ENS, if the current connected address has an associated ENS or else it sets
* the address of the connected account
*/
const setENSOrAddress = async (address, web3Provider) => {
// Lookup the ENS related to the given address
var _ens = await web3Provider.lookupAddress(address);
// If the address has an ENS set the ENS or else just set the address
if (_ens) {
setENS(_ens);
} else {
setAddress(address);
}
};
/**
* A `Provider` is needed to interact with the blockchain - reading transactions, reading balances, reading state, etc.
*
* A `Signer` is a special type of Provider used in case a `write` transaction needs to be made to the blockchain, which involves the connected account
* needing to make a digital signature to authorize the transaction being sent. Metamask exposes a Signer API to allow your website to
* request signatures from the user using Signer functions.
*/
const getProviderOrSigner = async () => {
// Connect to Metamask
// Since we store `web3Modal` as a reference, we need to access the `current` value to get access to the underlying object
const provider = await web3ModalRef.current.connect();
const web3Provider = new providers.Web3Provider(provider);
// If user is not connected to the Rinkeby network, let them know and throw an error
const { chainId } = await web3Provider.getNetwork();
if (chainId !== 4) {
window.alert("Change the network to Rinkeby");
throw new Error("Change network to Rinkeby");
}
const signer = web3Provider.getSigner();
// Get the address associated to the signer which is connected to MetaMask
const address = await signer.getAddress();
// Calls the function to set the ENS or Address
await setENSOrAddress(address, web3Provider);
return signer;
};
/*
connectWallet: Connects the MetaMask wallet
*/
const connectWallet = async () => {
try {
// Get the provider from web3Modal, which in our case is MetaMask
// When used for the first time, it prompts the user to connect their wallet
await getProviderOrSigner(true);
setWalletConnected(true);
} catch (err) {
console.error(err);
}
};
/*
renderButton: Returns a button based on the state of the dapp
*/
const renderButton = () => {
if (walletConnected) {
<div>Wallet connected</div>;
} else {
return (
<button onClick={connectWallet} className={styles.button}>
Connect your wallet
</button>
);
}
};
// useEffects are used to react to changes in state of the website
// The array at the end of function call represents what state changes will trigger this effect
// In this case, whenever the value of `walletConnected` changes - this effect will be called
useEffect(() => {
// if wallet is not connected, create a new instance of Web3Modal and connect the MetaMask wallet
if (!walletConnected) {
// Assign the Web3Modal class to the reference object by setting it's `current` value
// The `current` value is persisted throughout as long as this page is open
web3ModalRef.current = new Web3Modal({
network: "rinkeby",
providerOptions: {},
disableInjectedProvider: false,
});
connectWallet();
}
}, [walletConnected]);
return (
<div>
<Head>
<title>ENS Dapp</title>
<meta name="description" content="ENS-Dapp" />
<link rel="icon" href="/favicon.ico" />
</Head>
<div className={styles.main}>
<div>
<h1 className={styles.title}>
Welcome to LearnWeb3 Punks {ens ? ens : address}!
</h1>
<div className={styles.description}>
Its an NFT collection for LearnWeb3 Punks.
</div>
{renderButton()}
</div>
<div>
<img className={styles.image} src="./learnweb3punks.png" />
</div>
</div>
<footer className={styles.footer}>
Made with ❤ by LearnWeb3 Punks
</footer>
</div>
);
}
|
ENS 应用程序现在应该可以正常工作了
推到 Github
在继续之前,请确保已将所有代码推送到 github :)
部署 dApp
我们现在将部署您的 dApp,这样每个人都可以看到您的网站,您可以与您所有的 LearnWeb3DAO 朋友分享它。
![https://hicoldcat.oss-cn-hangzhou.aliyuncs.com/img/20220720220426.png https://hicoldcat.oss-cn-hangzhou.aliyuncs.com/img/20220720220426.png]()
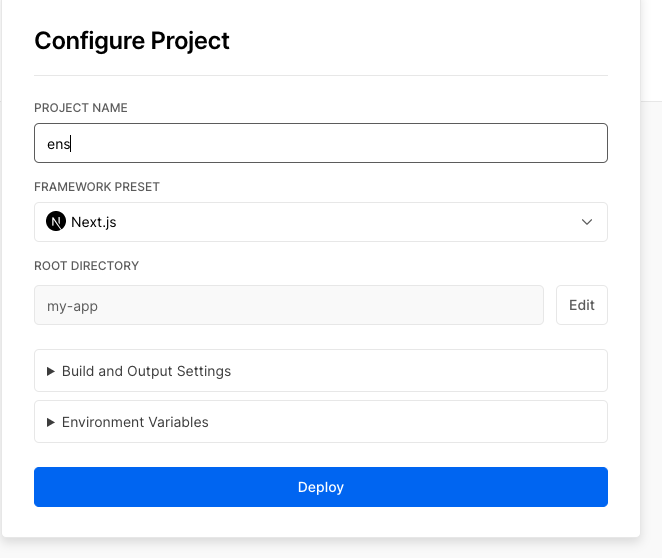
- 在配置你的新项目时,Vercel将允许你定制你的根目录
- 点击根目录旁边的编辑,并将其设置为我的应用程序
- 选择框架为
Next.js
- 单击 “部署”。
- 现在,你可以通过进入你的仪表板,选择你的项目,并从那里复制URL,看到你部署的网站
原文: https://www.learnweb3.io/tracks/junior/ethereum-name-service
![https://hicoldcat.oss-cn-hangzhou.aliyuncs.com/img/my.png https://hicoldcat.oss-cn-hangzhou.aliyuncs.com/img/my.png]()


