目录

Web3系列教程之进阶篇---11. The Graph索引协议
https://hicoldcat.oss-cn-hangzhou.aliyuncs.com/img/20220728212943.png

The Graph 是区块链的一个去中心化的查询协议和索引服务。它允许开发人员轻松地跟踪各种网络上的智能合约所发出的事件,并编写定制的数据转换脚本,这些脚本是实时运行的。这些数据也通过一个简单的GraphQL API提供,然后开发者可以用它来在他们的前端显示东西。

先决条件

  • 我们将使用yarn,它是一个和npm一样的包管理器。
  • 如果你的电脑还没有安装yarn的话,请从这里安装yarn
  • 请观看这个40分钟的GraphQL教程
  • 如果你不知道axios是什么,请看这个简短的教程
  • 你应该已经完成了 Chainlink VRF 的教程

它是如何工作的

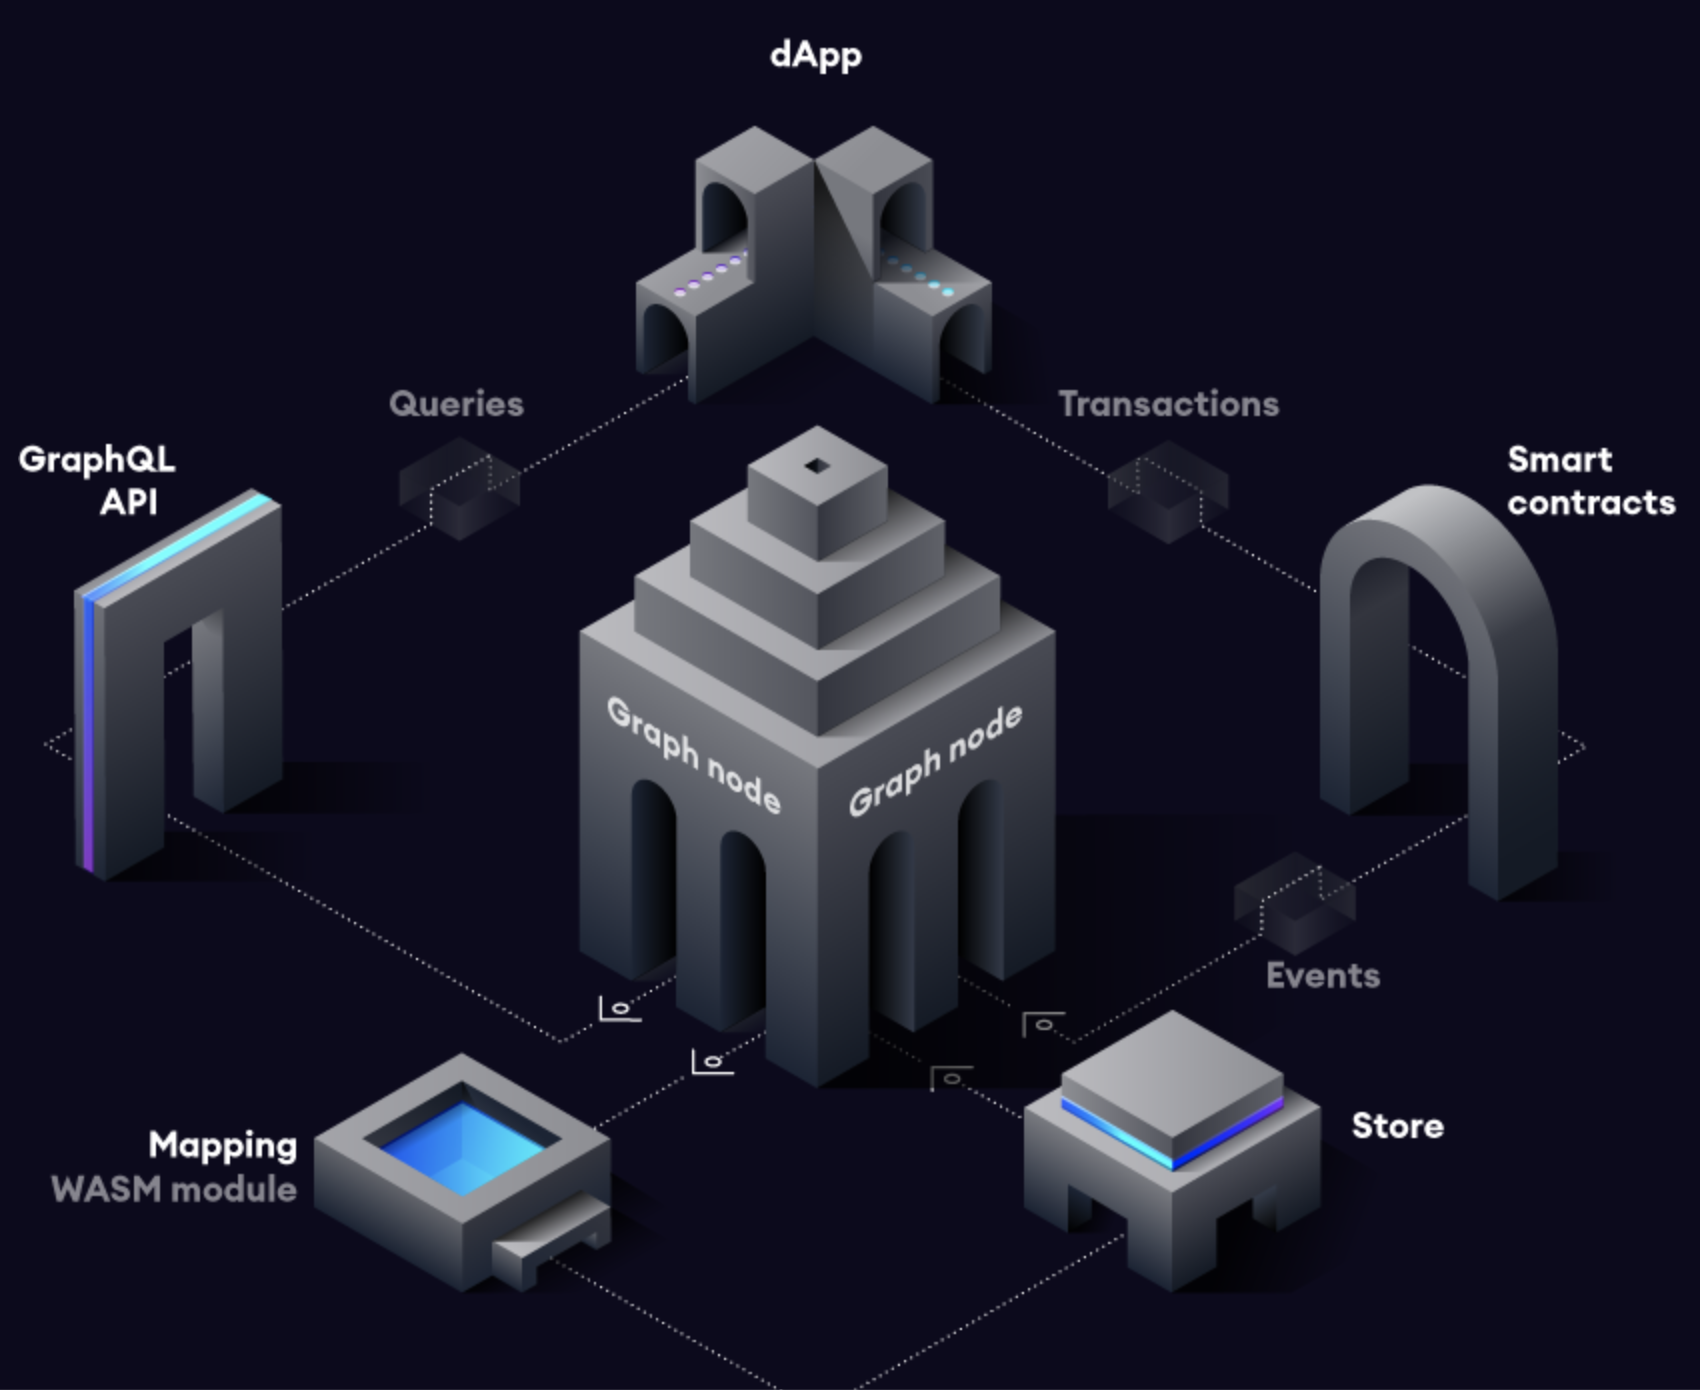
https://hicoldcat.oss-cn-hangzhou.aliyuncs.com/img/20220728213831.png

  1. dApp发送一个交易,之后一些数据被存储在智能合约中。然后这个智能合约发出一个或多个事件。
  2. Graph的节点不断扫描以太坊的新区块和这些区块可能包含的你的子图的数据。
  3. 如果节点找到你要找的并在你的子图中定义的事件,它就运行你定义的数据转换脚本(映射)。映射是一个WASM(Web assembly)模块,它响应事件,在图式节点上创建或更新数据Entities
  4. 我们可以使用 GraphQL Endpoint查询Graph的节点,以获得这些数据

构建

  • 我们将使用你在Chainlink VRF教程中创建的名为RandomWinnerGame的文件夹。
  • 在你的RandomWinnerGame文件夹内创建一个abi.json文件(你将需要这个文件来整合你的图)并复制以下内容
  • 请注意,这是你在Chainlink VRF教程中创建的RandomWinnerGame合同的ABI。
  • 因此,你的最终文件夹结构应该看起来像这样。
1
2
3
RandomWinnerGame
    - hardhat-tutorial
    - abi.json

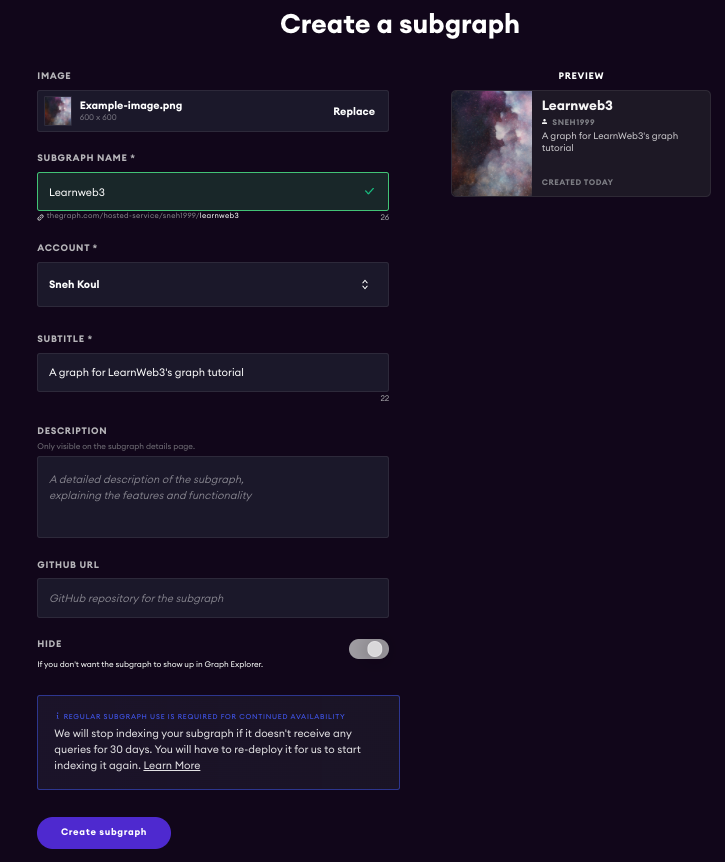
https://hicoldcat.oss-cn-hangzhou.aliyuncs.com/img/20220728215348.png

  • 单击 Add Subgraph,填写信息并创建子图。

https://hicoldcat.oss-cn-hangzhou.aliyuncs.com/img/20220728215433.png

  • 当你的子图被创建后,它将向你显示InstallInitDeploy中的一些命令

https://hicoldcat.oss-cn-hangzhou.aliyuncs.com/img/20220728215539.png

  • 在你的终端执行这个命令,指向RandomWinnerGame文件夹。
1
yarn global add @graphprotocol/graph-cli
  • 之后执行这个命令,但用你的Github用户名替换GITHUB_USERNAME,用你在Chainlink VRF教程中部署的RandomWinnerGame合约的地址替换YOUR_RANDOM_WINNER_GAME_CONTRACT_ADDRESS。之后的所有问题都按回车键 :)
1
graph init --contract-name RandomWinnerGame --product hosted-service GITHUB_USERNAME/Learnweb3  --from-contract YOUR_RANDOM_WINNER_GAME_CONTRACT_ADDRESS  --abi ./abi.json --network mumbai graph

https://hicoldcat.oss-cn-hangzhou.aliyuncs.com/img/20220728215711.png

1
   graph auth

https://hicoldcat.oss-cn-hangzhou.aliyuncs.com/img/20220728215957.png

  • 现在要执行的最后两条命令是
1
2
cd graph
yarn deploy

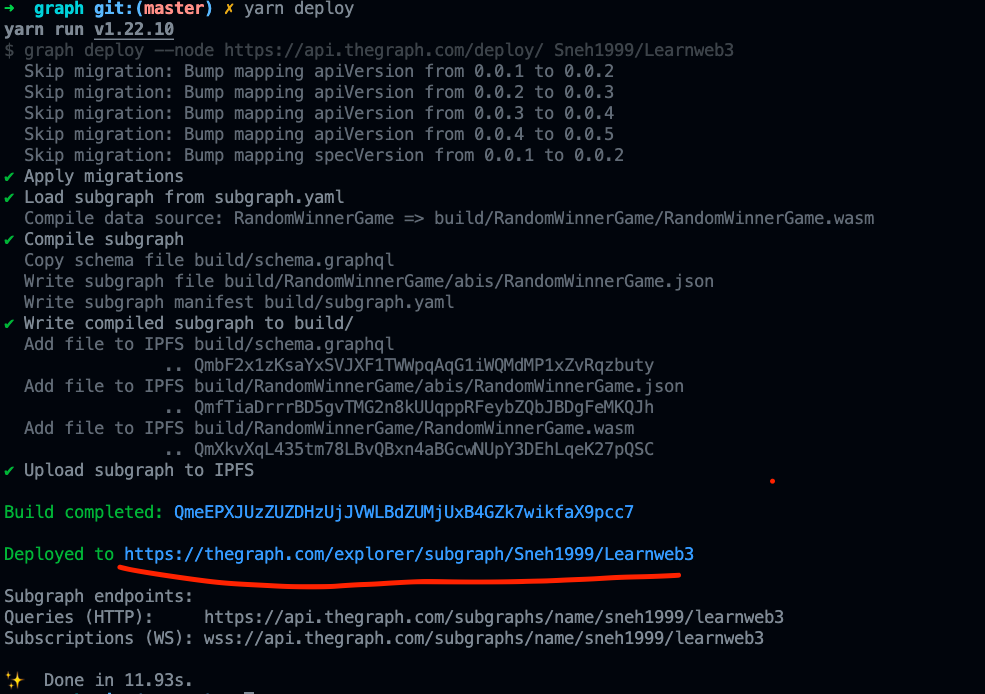
你可以回到The Graph’s Hosted Service ,点击 My Dashboard,你将能够看到你的图表,因为它现在已经部署了🚀 👀
https://hicoldcat.oss-cn-hangzhou.aliyuncs.com/img/20220728220201.png

你已经部署了你的第一个图表!!!。

现在,有趣的部分来了,我们将把The Graph提供给我们的默认代码修改为可以帮助我们跟踪合同事件的代码。

让我们开始吧

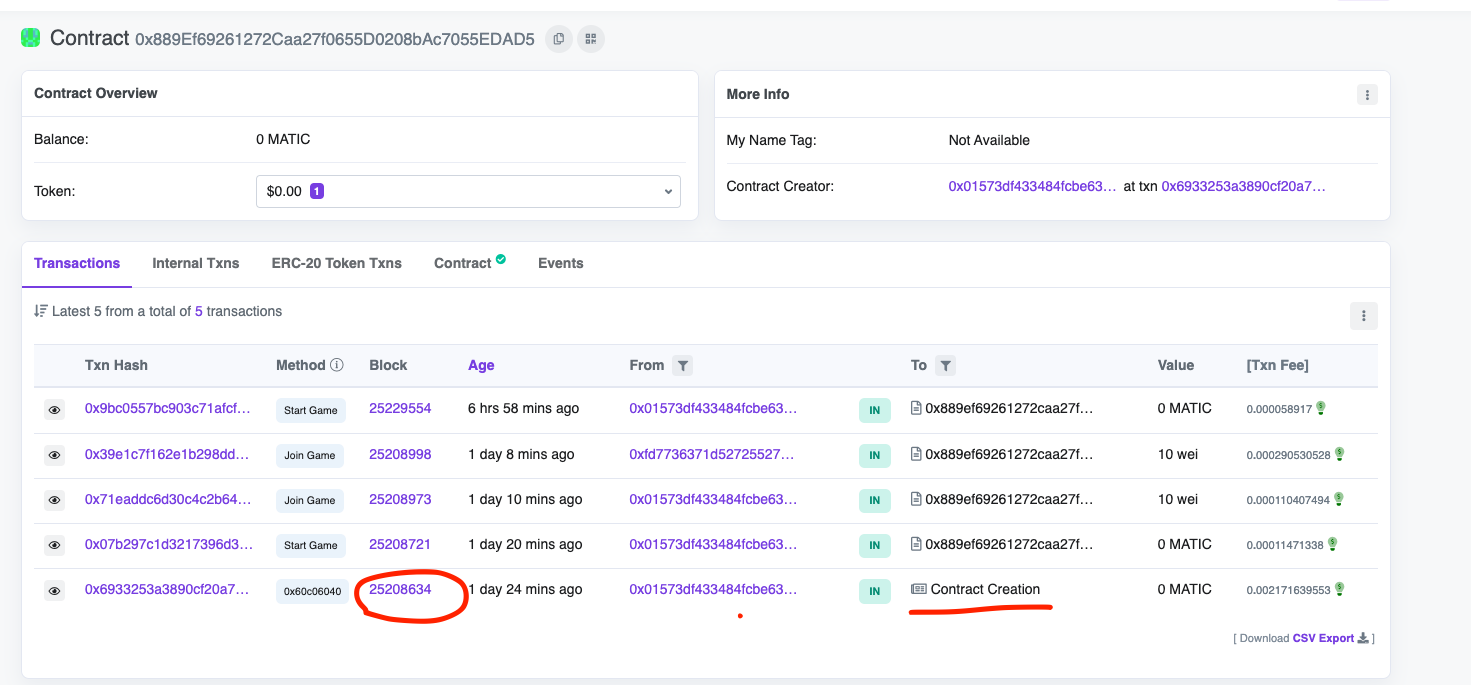
  • 打开graph文件夹中的subgraph.yaml,在abi: RamdomWinnerGame一行之后添加一个startBlock到yaml文件中。为了获得startBlock,你需要到 Mumbai PolygonScan中搜索你的合同地址,然后你需要复制你的合同所在区块的区块号。

  • 开始区块没有默认设置,但因为我们知道我们只需要跟踪合同部署区块的事件,所以我们不需要同步整个区块链,只需要同步合同部署后的部分来跟踪事件。
https://hicoldcat.oss-cn-hangzhou.aliyuncs.com/img/20220728220617.png

1
2
3
4
source:
  address: "0x889Ef69261272Caa27f0655D0208bAc7055EDAD5"
  abi: RandomWinnerGame
  startBlock: BLOCK_NUMBER

你的最终文件应该是这样

  • 好了,现在是时候创建一些Entities了。Entities是定义你的数据将如何存储在The Graph's nodes的结构的对象。如果你想阅读更多关于它们的信息,请点击这个链接

我们将需要一个Entity,它可以涵盖我们事件中的所有变量,以便我们可以跟踪所有的变量。打开schema.graphql文件,用以下几行代码替换已有的代码。

1
2
3
4
5
6
7
8
type Game @entity {
  id: ID!
  maxPlayers: Int!
  entryFee: BigInt!
  winner: Bytes
  requestId: Bytes
  players: [Bytes!]!
}
  • 这里的ID是一个游戏的唯一标识符,将等同于我们在合同中的gameId变量。
  • maxPlayers将记录这个游戏中允许有多少最大的玩家。
  • entryFee是进入游戏的费用,它是一个BigInt,因为在我们的合同中, entryFee是一个uint256,它是一个BigNumber。
  • winner是游戏中赢家的地址,定义为Bytes,因为地址是一个十六进制的字符串。
  • requestId也是一个十六进制的字符串,因此被定义为Bytes
  • players是游戏中玩家的地址列表,由于每个地址都是一个十六进制的字符串,我们将玩家符号化为一个字节数组。
  • 另外,请注意表示必须的变量,我们将maxPlayersentryFeeplayerid标记为必须,因为当Game最初启动时,它将发出GameStarted事件,该事件将发出这三个变量(maxPlayersentryFeeid),所以没有这三个变量,一个Game实体永远无法被创建,对于player阵列,它将被我们初始化为一个空阵列。
  • winnerrequestId将与GameEnded事件一起出现,players将跟踪每个player address,这是由PlayerJoined事件发出的。

如果你想了解更多的类型,你可以访问这个链接

好了,现在我们已经让the graph知道我们将追踪什么样的数据,以及它将包含什么🥳 🥳 🥳

现在是查询这些数据的时候了🎉

Graph 有一个惊人的功能,给定的Entity可以为你自动生成大块的代码!!。

这不是很神奇吗?让我们使用这个功能。在你的终端指向 the graph目录,执行以下命令

1
yarn codegen
  • 在这之后,The Graph将为你创建大部分的代码,希望你的映射。
  • 如果你看一下 src 中的 mapping.ts,graph 会为你创建一些函数,每个都指向你在合同中创建的一个事件。
  • 每次Graph发现与这些函数有关的事件时,这些函数都会被调用。
  • 我们将为这些函数添加一些代码,这样我们就可以在事件来临时存储数据。
  • 复制以下几行代码到你的mapping.ts
 1
 2
 3
 4
 5
 6
 7
 8
 9
10
11
12
13
14
15
16
17
18
19
20
21
22
23
24
25
26
27
28
29
30
31
32
33
34
35
36
37
38
39
40
41
42
43
44
45
46
47
48
49
50
51
52
53
54
55
56
57
58
59
60
import { BigInt } from "@graphprotocol/graph-ts";
import {
  PlayerJoined,
  GameEnded,
  GameStarted,
  OwnershipTransferred,
} from "../generated/RandomWinnerGame/RandomWinnerGame";
import { Game } from "../generated/schema";

export function handleGameEnded(event: GameEnded): void {
  // Entities can be loaded from the store using a string ID; this ID
  // needs to be unique across all entities of the same type
  let entity = Game.load(event.params.gameId.toString());
  // Entities only exist after they have been saved to the store;
  // `null` checks allow to create entities on demand
  if (!entity) {
    return;
  }
  // Entity fields can be set based on event parameters
  entity.winner = event.params.winner;
  entity.requestId = event.params.requestId;
  // Entities can be written to the store with `.save()`
  entity.save();
}

export function handlePlayerJoined(event: PlayerJoined): void {
  // Entities can be loaded from the store using a string ID; this ID
  // needs to be unique across all entities of the same type
  let entity = Game.load(event.params.gameId.toString());
  // Entities only exist after they have been saved to the store;
  // `null` checks allow to create entities on demand
  if (!entity) {
    return;
  }
  // Entity fields can be set based on event parameters
  let newPlayers = entity.players;
  newPlayers.push(event.params.player);
  entity.players = newPlayers;
  // Entities can be written to the store with `.save()`
  entity.save();
}

export function handleGameStarted(event: GameStarted): void {
  // Entities can be loaded from the store using a string ID; this ID
  // needs to be unique across all entities of the same type
  let entity = Game.load(event.params.gameId.toString());
  // Entities only exist after they have been saved to the store;
  // `null` checks allow to create entities on demand
  if (!entity) {
    entity = new Game(event.params.gameId.toString());
    entity.players = [];
  }
  // Entity fields can be set based on event parameters
  entity.maxPlayers = event.params.maxPlayers;
  entity.entryFee = event.params.entryFee;
  // Entities can be written to the store with `.save()`
  entity.save();
}

export function handleOwnershipTransferred(event: OwnershipTransferred): void {}
  • 让我们了解handleGameEnded函数中发生了什么

    • 它接受GameEnded事件并期望void被返回,这意味着函数没有返回任何内容
    • 它从Graph的数据库中加载一个Game对象,其ID等于Graph检测到的事件中存在的gameId
    • 如果具有给定的实体id不存在,则从函数返回并且不做任何事情
    • 如果存在,则将事件中的获胜者和 requestId 设置到我们的游戏对象中(注意GameEnded事件有获胜者和 requestId)
    • 然后将这个更新的游戏对象保存回Graph's DB
    • 对于每个游戏,都会有一个独特的Game对象,该对象将具有独特的gameId
  • 现在让我们看看在handlePlayerJoined中发生了什么。

    • 它从Graph的数据库中加载一个Game对象,其ID等于Graph检测到的事件中存在的gameId
    • 如果一个具有给定ID的实体不存在,则从函数中返回,不做任何事情。
    • 为了实际更新玩家的数组,我们需要重新分配包含数组的实体上的属性(即玩家),类似于我们给实体上的其他属性(如maxPlayers)赋值的方法。因此,我们需要创建一个临时数组,其中包含所有现有的entity.player元素,推送到该数组,并重新分配entity.player,使其等于新数组。
    • 然后将这个更新的游戏对象保存到Graph's DB中。
  • 现在让我们看看handleGameStarted中发生了什么

    • 它从Graph的数据库中加载一个Game对象,其ID等于Graph检测到的事件中存在的gameId
    • 如果一个这样的实体不存在,就创建一个新的,同时初始化玩家数组
    • 然后在我们的游戏对象中设置事件中的maxPlayer和entryFee。
    • 将这个更新的游戏对象保存到Graph's DB

现在你可以去你的终端,指向graph文件夹,执行以下命令。

1
yarn deploy
  • 部署好The Graph’s Hosted Service,点击 My Dashboard,你就可以看到你的图表了。
  • 点击你的图表,确保它显示已同步,如果没有,请等待它被同步后再继续。

https://hicoldcat.oss-cn-hangzhou.aliyuncs.com/img/20220728223345.png

网站

  • 为了开发该网站,我们将使用ReactNext Js.。React是一个用于制作网站的javascript框架,而Next Js是建立在React之上的。

  • 首先,你将需要创建一个新的next应用程序。你的文件夹结构应该是这样的

1
2
3
4
5
- RandomWinnerGame
   - graph
   - hardhat-tutorial
   - next-app
   - abi.json
  • 要创建这个next-app,在终端指向RandomWinnerGame文件夹并输入
1
npx create-next-app@latest

并对所有问题按回车键

  • 现在要运行该应用程序,在终端执行这些命令
1
2
cd my-app
npm run dev
  • 现在让我们安装Web3Modal库(https://github.com/Web3Modal/web3modal)。Web3Modal是一个易于使用的库,帮助开发者通过简单的可定制配置在他们的应用程序中添加对多个供应商的支持。默认情况下,Web3Modal库支持注入的提供者,如(Metamask、Dapper、Gnosis Safe、Frame、Web3 Browsers等),你也可以轻松配置该库以支持Portis、Fortmatic、Squarelink、Torus、Authereum、D’CENT Wallet和Arkane。打开终端,指向my-app目录,执行以下命令
1
npm install web3modal
  • 在同一终端中也安装ethers.js
1
npm i ethers
  • 我们还将使用axios来向 the graph,发送请求,所以让我们安装它吧
1
npm i axios
  • 在你的公共文件夹中,下载这张图片。确保下载的图像名称为 randomWinner.png

  • 现在去style文件夹,用以下代码替换Home.modules.css文件的所有内容,这将给你的dapp添加一些样式。

  •  1
     2
     3
     4
     5
     6
     7
     8
     9
    10
    11
    12
    13
    14
    15
    16
    17
    18
    19
    20
    21
    22
    23
    24
    25
    26
    27
    28
    29
    30
    31
    32
    33
    34
    35
    36
    37
    38
    39
    40
    41
    42
    43
    44
    45
    46
    47
    48
    49
    50
    51
    52
    53
    54
    55
    56
    57
    58
    59
    60
    61
    62
    63
    64
    65
    66
    67
    68
    
    .main {
      min-height: 90vh;
      display: flex;
      flex-direction: row;
      justify-content: center;
      align-items: center;
      font-family: "Courier New", Courier, monospace;
    }
    
    .footer {
      display: flex;
      padding: 2rem 0;
      border-top: 1px solid #eaeaea;
      justify-content: center;
      align-items: center;
    }
    
    .input {
      width: 200px;
      height: 100%;
      padding: 1%;
      margin: 2%;
      box-shadow: 0 0 15px 4px rgba(0, 0, 0, 0.06);
      border-radius: 10px;
    }
    
    .image {
      width: 70%;
      height: 50%;
      margin-left: 20%;
    }
    
    .title {
      font-size: 2rem;
      margin: 2rem 1rem;
    }
    
    .description {
      line-height: 1;
      margin: 2rem 1rem;
      font-size: 1.2rem;
    }
    
    .log {
      line-height: 1rem;
      margin: 1rem 1rem;
      font-size: 1rem;
    }
    
    .button {
      border-radius: 4px;
      background-color: blue;
      border: none;
      color: #ffffff;
      font-size: 15px;
      padding: 8px;
      width: 200px;
      cursor: pointer;
      margin: 2rem 1rem;
    }
    @media (max-width: 1000px) {
      .main {
        width: 100%;
        flex-direction: column;
        justify-content: center;
        align-items: center;
      }
    }
    
  • 现在让我们写一些代码来查询 the graph,,在你的my-app文件夹内创建一个新的文件夹,并命名为queries。在queries文件夹中创建一个名为index.js的新文件,并粘贴以下几行代码。

 1
 2
 3
 4
 5
 6
 7
 8
 9
10
11
export function FETCH_CREATED_GAME() {
  return `query {
        games(orderBy:id, orderDirection:desc, first: 1) {
            id
            maxPlayers
            entryFee
            winner
            players
        }
    }`;
}
  • 正如你所看到的,我们创建了一个GraphQL查询,我们说我们想要一个game对象,其中的数据按Id(也就是gameId)降序排列,我们想从这个有序的数据中获得第一个游戏。
  • 让我们用一个例子来简化这个问题。假设你有三个游戏对象存储在The Graph's内。
 1
 2
 3
 4
 5
 6
 7
 8
 9
10
11
12
13
14
15
16
17
18
19
20
21
22
23
24
   {
      "id": "1",
      "maxPlayers": 2,
      "entryFee": "10000000000000",
      "winner": "0xdb6eaffa95899b53b27086bd784f3bbfd58ff843"
    },
    {
      "id": "2",
      "maxPlayers": 2,
      "entryFee": "10000000000000",
      "winner": "0x01573df433484fcbe6325a0c6e051dc62ab107d1"
    },
    {
      "id": "3",
      "maxPlayers": 2,
      "entryFee": "100000000000000",
      "winner": "0x01573df433484fcbe6325a0c6e051dc62ab107d1"
    },
    {
      "id": "4",
      "maxPlayers": 2,
      "entryFee": "10",
      "winner": null
    }
  • 现在你希望每次都是最新的游戏。为了得到最新的游戏,你首先要按id排序,然后把这些数据按降序排列,这样gameId 4就可以排在最前面(它将是当前的游戏),然后我们说first:1,因为我们只想要gameId 4对象,我们不关心旧游戏。

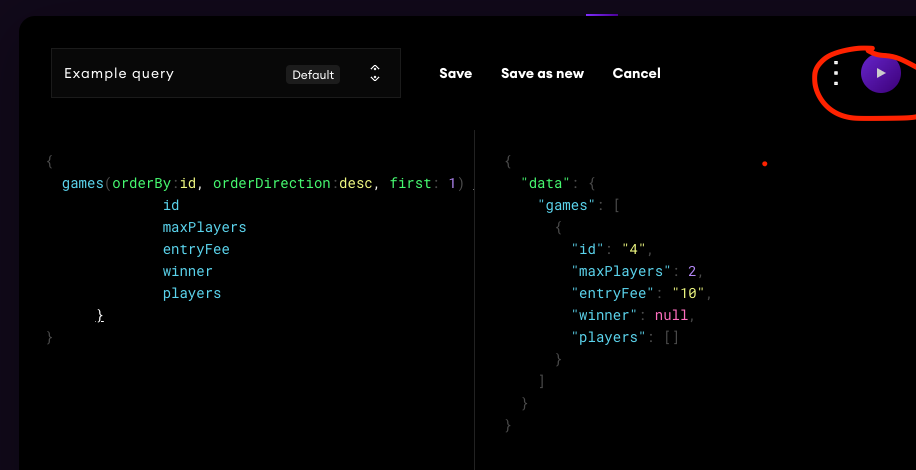
  • 你实际上可以看到这个查询在the graph'的托管服务上工作。让我们试着这样做。

  • 我已经部署了一个graph,让我们看看graph,并使用查询来查询它,进入这个链接

  • 用我们的查询替换示例查询,并点击紫色的播放按钮

https://hicoldcat.oss-cn-hangzhou.aliyuncs.com/img/20220728224701.png

  • 你可以看到我的graph 出现了一些数据,游戏的ID是4。

  • 简单吧?是的,确实如此 😎

  • 你可以通过 My dashboard进入你的图表,做同样的事情🚀,这将很有趣。

  • 让我们继续…

  • 通过Graph已经提供的UI进行操作是很好的,但是要在我们的前端使用这个,我们需要写一个axios post request,这样我们就可以从 the graph中获得这些数据。

  • 创建一个名为utils的新文件夹,并在该文件夹中创建一个名为index.js的新文件。在index.js文件中复制以下几行代码。

 1
 2
 3
 4
 5
 6
 7
 8
 9
10
11
12
13
14
15
16
17
18
19
import axios from "axios";

export async function subgraphQuery(query) {
  try {
    // Replace YOUR-SUBGRAPH-URL with the url of your subgraph
    const SUBGRAPH_URL = "YOUR-SUBGRAPH-URL";
    const response = await axios.post(SUBGRAPH_URL, {
      query,
    });
    if (response.data.errors) {
      console.error(response.data.errors);
      throw new Error(`Error making subgraph query ${response.data.errors}`);
    }
    return response.data.data;
  } catch (error) {
    console.error(error);
    throw new Error(`Could not query the subgraph ${error.message}`);
  }
}
  • 让我们试着理解这个函数中发生了什么
    • 它需要一个SUBGRAPH_URL,你需要将 “YOUR-SUBGRAPH-URL “替换为你的子图的URL,你可以通过进入图的hosted service ,点击My dashboard,然后点击你的图来获得。复制Queries(HTTP)下的网址

https://hicoldcat.oss-cn-hangzhou.aliyuncs.com/img/20220728225012.png

然后它用我们用axios post request创建的查询来调用这个网址

然后,它处理任何错误,如果没有错误,则发回答复。

  • 现在打开page文件夹下的index.js文件,粘贴以下代码,代码的解释可以在评论中找到。
  1
  2
  3
  4
  5
  6
  7
  8
  9
 10
 11
 12
 13
 14
 15
 16
 17
 18
 19
 20
 21
 22
 23
 24
 25
 26
 27
 28
 29
 30
 31
 32
 33
 34
 35
 36
 37
 38
 39
 40
 41
 42
 43
 44
 45
 46
 47
 48
 49
 50
 51
 52
 53
 54
 55
 56
 57
 58
 59
 60
 61
 62
 63
 64
 65
 66
 67
 68
 69
 70
 71
 72
 73
 74
 75
 76
 77
 78
 79
 80
 81
 82
 83
 84
 85
 86
 87
 88
 89
 90
 91
 92
 93
 94
 95
 96
 97
 98
 99
100
101
102
103
104
105
106
107
108
109
110
111
112
113
114
115
116
117
118
119
120
121
122
123
124
125
126
127
128
129
130
131
132
133
134
135
136
137
138
139
140
141
142
143
144
145
146
147
148
149
150
151
152
153
154
155
156
157
158
159
160
161
162
163
164
165
166
167
168
169
170
171
172
173
174
175
176
177
178
179
180
181
182
183
184
185
186
187
188
189
190
191
192
193
194
195
196
197
198
199
200
201
202
203
204
205
206
207
208
209
210
211
212
213
214
215
216
217
218
219
220
221
222
223
224
225
226
227
228
229
230
231
232
233
234
235
236
237
238
239
240
241
242
243
244
245
246
247
248
249
250
251
252
253
254
255
256
257
258
259
260
261
262
263
264
265
266
267
268
269
270
271
272
273
274
275
276
277
278
279
280
281
282
283
284
285
286
287
288
289
290
291
292
293
294
295
296
297
298
299
300
301
302
303
304
305
306
307
308
309
310
311
312
313
314
315
316
317
318
319
320
321
322
323
324
325
326
327
328
329
330
331
332
333
334
335
336
337
338
339
340
341
342
343
import { BigNumber, Contract, ethers, providers, utils } from "ethers";
import Head from "next/head";
import React, { useEffect, useRef, useState } from "react";
import Web3Modal from "web3modal";
import { abi, RANDOM_GAME_NFT_CONTRACT_ADDRESS } from "../constants";
import { FETCH_CREATED_GAME } from "../queries";
import styles from "../styles/Home.module.css";
import { subgraphQuery } from "../utils";

export default function Home() {
  const zero = BigNumber.from("0");
  // walletConnected keep track of whether the user's wallet is connected or not
  const [walletConnected, setWalletConnected] = useState(false);
  // loading is set to true when we are waiting for a transaction to get mined
  const [loading, setLoading] = useState(false);
  // boolean to keep track of whether the current connected account is owner or not
  const [isOwner, setIsOwner] = useState(false);
  // entryFee is the ether required to enter a game
  const [entryFee, setEntryFee] = useState(zero);
  // maxPlayers is the max number of players that can play the game
  const [maxPlayers, setMaxPlayers] = useState(0);
  // Checks if a game started or not
  const [gameStarted, setGameStarted] = useState(false);
  // Players that joined the game
  const [players, setPlayers] = useState([]);
  // Winner of the game
  const [winner, setWinner] = useState();
  // Keep a track of all the logs for a given game
  const [logs, setLogs] = useState([]);
  // Create a reference to the Web3 Modal (used for connecting to Metamask) which persists as long as the page is open
  const web3ModalRef = useRef();

  // This is used to force react to re render the page when we want to
  // in our case we will use force update to show new logs
  const forceUpdate = React.useReducer(() => ({}), {})[1];

  /*
    connectWallet: Connects the MetaMask wallet
  */
  const connectWallet = async () => {
    try {
      // Get the provider from web3Modal, which in our case is MetaMask
      // When used for the first time, it prompts the user to connect their wallet
      await getProviderOrSigner();
      setWalletConnected(true);
    } catch (err) {
      console.error(err);
    }
  };

  /**
   * Returns a Provider or Signer object representing the Ethereum RPC with or without the
   * signing capabilities of metamask attached
   *
   * A `Provider` is needed to interact with the blockchain - reading transactions, reading balances, reading state, etc.
   *
   * A `Signer` is a special type of Provider used in case a `write` transaction needs to be made to the blockchain, which involves the connected account
   * needing to make a digital signature to authorize the transaction being sent. Metamask exposes a Signer API to allow your website to
   * request signatures from the user using Signer functions.
   *
   * @param {*} needSigner - True if you need the signer, default false otherwise
   */
  const getProviderOrSigner = async (needSigner = false) => {
    // Connect to Metamask
    // Since we store `web3Modal` as a reference, we need to access the `current` value to get access to the underlying object
    const provider = await web3ModalRef.current.connect();
    const web3Provider = new providers.Web3Provider(provider);

    // If user is not connected to the Mumbai network, let them know and throw an error
    const { chainId } = await web3Provider.getNetwork();
    if (chainId !== 80001) {
      window.alert("Change the network to Mumbai");
      throw new Error("Change network to Mumbai");
    }

    if (needSigner) {
      const signer = web3Provider.getSigner();
      return signer;
    }
    return web3Provider;
  };

  /**
   * startGame: Is called by the owner to start the game
   */
  const startGame = async () => {
    try {
      // Get the signer from web3Modal, which in our case is MetaMask
      // No need for the Signer here, as we are only reading state from the blockchain
      const signer = await getProviderOrSigner(true);
      // We connect to the Contract using a signer because we want the owner to
      // sign the transaction
      const randomGameNFTContract = new Contract(
        RANDOM_GAME_NFT_CONTRACT_ADDRESS,
        abi,
        signer
      );
      setLoading(true);
      // call the startGame function from the contract
      const tx = await randomGameNFTContract.startGame(maxPlayers, entryFee);
      await tx.wait();
      setLoading(false);
    } catch (err) {
      console.error(err);
      setLoading(false);
    }
  };

  /**
   * startGame: Is called by a player to join the game
   */
  const joinGame = async () => {
    try {
      // Get the signer from web3Modal, which in our case is MetaMask
      // No need for the Signer here, as we are only reading state from the blockchain
      const signer = await getProviderOrSigner(true);
      // We connect to the Contract using a signer because we want the owner to
      // sign the transaction
      const randomGameNFTContract = new Contract(
        RANDOM_GAME_NFT_CONTRACT_ADDRESS,
        abi,
        signer
      );
      setLoading(true);
      // call the startGame function from the contract
      const tx = await randomGameNFTContract.joinGame({
        value: entryFee,
      });
      await tx.wait();
      setLoading(false);
    } catch (error) {
      console.error(error);
      setLoading(false);
    }
  };

  /**
   * checkIfGameStarted checks if the game has started or not and intializes the logs
   * for the game
   */
  const checkIfGameStarted = async () => {
    try {
      // Get the provider from web3Modal, which in our case is MetaMask
      // No need for the Signer here, as we are only reading state from the blockchain
      const provider = await getProviderOrSigner();
      // We connect to the Contract using a Provider, so we will only
      // have read-only access to the Contract
      const randomGameNFTContract = new Contract(
        RANDOM_GAME_NFT_CONTRACT_ADDRESS,
        abi,
        provider
      );
      // read the gameStarted boolean from the contract
      const _gameStarted = await randomGameNFTContract.gameStarted();

      const _gameArray = await subgraphQuery(FETCH_CREATED_GAME());
      const _game = _gameArray.games[0];
      let _logs = [];
      // Initialize the logs array and query the graph for current gameID
      if (_gameStarted) {
        _logs = [`Game has started with ID: ${_game.id}`];
        if (_game.players && _game.players.length > 0) {
          _logs.push(
            `${_game.players.length} / ${_game.maxPlayers} already joined 👀 `
          );
          _game.players.forEach((player) => {
            _logs.push(`${player} joined 🏃‍♂️`);
          });
        }
        setEntryFee(BigNumber.from(_game.entryFee));
        setMaxPlayers(_game.maxPlayers);
      } else if (!gameStarted && _game.winner) {
        _logs = [
          `Last game has ended with ID: ${_game.id}`,
          `Winner is: ${_game.winner} 🎉 `,
          `Waiting for host to start new game....`,
        ];

        setWinner(_game.winner);
      }
      setLogs(_logs);
      setPlayers(_game.players);
      setGameStarted(_gameStarted);
      forceUpdate();
    } catch (error) {
      console.error(error);
    }
  };

  /**
   * getOwner: calls the contract to retrieve the owner
   */
  const getOwner = async () => {
    try {
      // Get the provider from web3Modal, which in our case is MetaMask
      // No need for the Signer here, as we are only reading state from the blockchain
      const provider = await getProviderOrSigner();
      // We connect to the Contract using a Provider, so we will only
      // have read-only access to the Contract
      const randomGameNFTContract = new Contract(
        RANDOM_GAME_NFT_CONTRACT_ADDRESS,
        abi,
        provider
      );
      // call the owner function from the contract
      const _owner = await randomGameNFTContract.owner();
      // We will get the signer now to extract the address of the currently connected MetaMask account
      const signer = await getProviderOrSigner(true);
      // Get the address associated to the signer which is connected to  MetaMask
      const address = await signer.getAddress();
      if (address.toLowerCase() === _owner.toLowerCase()) {
        setIsOwner(true);
      }
    } catch (err) {
      console.error(err.message);
    }
  };

  // useEffects are used to react to changes in state of the website
  // The array at the end of function call represents what state changes will trigger this effect
  // In this case, whenever the value of `walletConnected` changes - this effect will be called
  useEffect(() => {
    // if wallet is not connected, create a new instance of Web3Modal and connect the MetaMask wallet
    if (!walletConnected) {
      // Assign the Web3Modal class to the reference object by setting it's `current` value
      // The `current` value is persisted throughout as long as this page is open
      web3ModalRef.current = new Web3Modal({
        network: "mumbai",
        providerOptions: {},
        disableInjectedProvider: false,
      });
      connectWallet();
      getOwner();
      checkIfGameStarted();
      setInterval(() => {
        checkIfGameStarted();
      }, 2000);
    }
  }, [walletConnected]);

  /*
    renderButton: Returns a button based on the state of the dapp
  */
  const renderButton = () => {
    // If wallet is not connected, return a button which allows them to connect their wllet
    if (!walletConnected) {
      return (
        <button onClick={connectWallet} className={styles.button}>
          Connect your wallet
        </button>
      );
    }

    // If we are currently waiting for something, return a loading button
    if (loading) {
      return <button className={styles.button}>Loading...</button>;
    }
    // Render when the game has started
    if (gameStarted) {
      if (players.length === maxPlayers) {
        return (
          <button className={styles.button} disabled>
            Choosing winner...
          </button>
        );
      }
      return (
        <div>
          <button className={styles.button} onClick={joinGame}>
            Join Game 🚀
          </button>
        </div>
      );
    }
    // Start the game
    if (isOwner && !gameStarted) {
      return (
        <div>
          <input
            type="number"
            className={styles.input}
            onChange={(e) => {
              // The user will enter the value in ether, we will need to convert
              // it to WEI using parseEther
              setEntryFee(
                e.target.value >= 0
                  ? utils.parseEther(e.target.value.toString())
                  : zero
              );
            }}
            placeholder="Entry Fee (ETH)"
          />
          <input
            type="number"
            className={styles.input}
            onChange={(e) => {
              // The user will enter the value in ether, we will need to convert
              // it to WEI using parseEther
              setMaxPlayers(e.target.value ?? 0);
            }}
            placeholder="Max players"
          />
          <button className={styles.button} onClick={startGame}>
            Start Game 🚀
          </button>
        </div>
      );
    }
  };

  return (
    <div>
      <Head>
        <title>LW3Punks</title>
        <meta name="description" content="LW3Punks-Dapp" />
        <link rel="icon" href="/favicon.ico" />
      </Head>
      <div className={styles.main}>
        <div>
          <h1 className={styles.title}>Welcome to Random Winner Game!</h1>
          <div className={styles.description}>
            Its a lottery game where a winner is chosen at random and wins the
            entire lottery pool
          </div>
          {renderButton()}
          {logs &&
            logs.map((log, index) => (
              <div className={styles.log} key={index}>
                {log}
              </div>
            ))}
        </div>
        <div>
          <img className={styles.image} src="./randomWinner.png" />
        </div>
      </div>

      <footer className={styles.footer}>
        Made with &#10084; by Your Name
      </footer>
    </div>
  );
}
  • 现在在my-app文件夹下创建一个新的文件夹,并将其命名为constants

  • constants文件夹中创建一个index.js文件,并粘贴以下代码。

    • 替换 "address of your RandomWinnerGame contract"与您部署和保存到您的记事本的RandomWinnerGame合同的地址。
    • 替换---your abi---为你的RandomWinnerGame合同的ABI。为了得到你的合同的ABI,去你的hardhat-tutorial/artifacts/contracts/RandomWinnerGame.sol文件夹,从RandomWinnerGame.json文件得到 "abi"键下的数组标记。
1
2
export const abi =---your abi---
export const RANDOM_GAME_NFT_CONTRACT_ADDRESS = "address of your RandomWinnerGame contract"
  • 现在,在你的终端,也就是指向my-app文件夹,执行
1
npm run dev
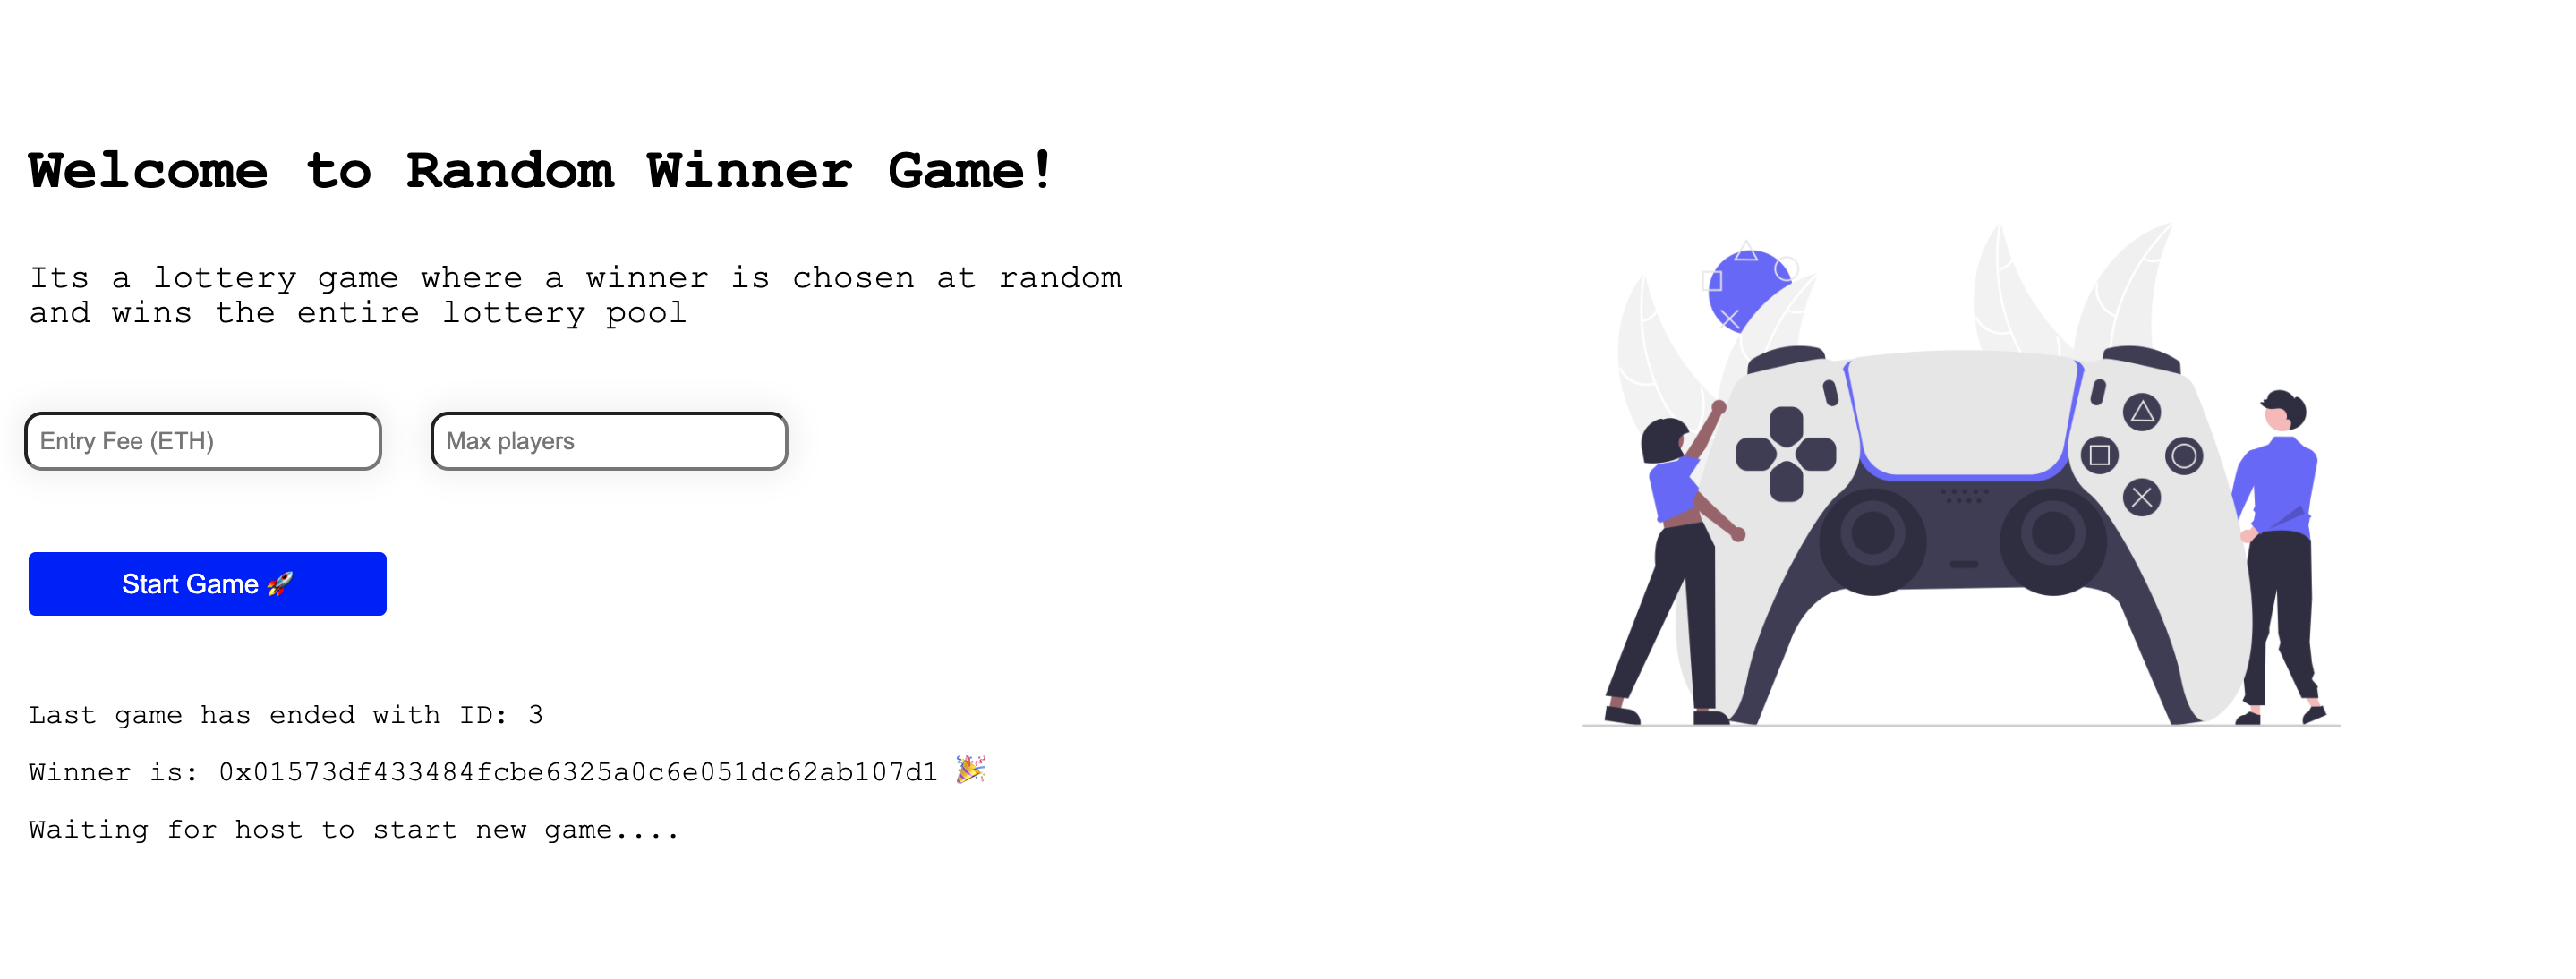
  • 你的RandomWinnerGame dapp现在应该没有错误地工作了 🚀
  • 玩游戏玩得开心

推送到github

在继续之前,请确保你已经将所有的代码推送到github :)

部署你的dApp

现在我们将部署你的DApp,这样大家就可以看到你的网站,你也可以和所有LearnWeb3 DAO的朋友分享。

  • 到https://vercel.com/,用你的GitHub登录。

  • 然后点击New Project按钮,然后选择你的RandomWinnerGame 仓库。

  • 在配置你的新项目时,Vercel将允许你自定义你的Root Directory

  • 点击Root Directory旁边的Edit,并将其设置为my-app

  • 选择框架为Next.js

  • 点击部署

https://hicoldcat.oss-cn-hangzhou.aliyuncs.com/img/20220728225913.png

  • 现在,你可以通过进入你的仪表板,选择你的项目,并从那里复制domain来查看你部署的网站!

  • 与大家分享这个域名,让大家一起玩游戏 🚀🚀🚀🚀

原文: https://www.learnweb3.io/tracks/junior/the-graph-protocol

https://hicoldcat.oss-cn-hangzhou.aliyuncs.com/img/my.png