了解 Web3UI 工具包的基础知识,以及如何快速构建设计良好、易于访问的用户界面!
介绍
web3 生态系统优先考虑基于区块链的项目的后端开发,而对前端技术栈几乎没有贡献。
前端是应用程序的图形用户界面 (UI) 的开发。它描述了用户如何在浏览器上呈现和交互数据;基本上应用程序的一般执行方式。
在本文中,我们将讨论第一个 web3 前端库Web3UI Kit ,我们还将使用它和 Moralis React SDK 构建一个 dApp 仪表板。
先决条件
本文是基于项目的,在继续本教程之前,您应该具备以下条件:
我们正在使用 Web3UI 工具包构建什么?
我们将构建一个 dApp 仪表板,显示主网、Kovan、Rinkeby、Goerli 和 Ropsten 测试网上连接用户的所有 NFT 和余额。
完成本教程后,您将了解如何使用 Web3UI Kit 组件设置和构建 web3 前端。
这个怎么运作
在下面查看我们的 dApp 仪表板如何运行的基本流程:
1. 用户通过连接钱包登录:
![用户连接钱包的登录页面 https://hicoldcat.oss-cn-hangzhou.aliyuncs.com/img/20220912094718.png]()
2. 连接的用户将被重定向到他们的仪表板:
![连接的用户可以访问 Web3 dApp 仪表板并查看他们的余额 https://hicoldcat.oss-cn-hangzhou.aliyuncs.com/img/20220912094804.png]()
演示
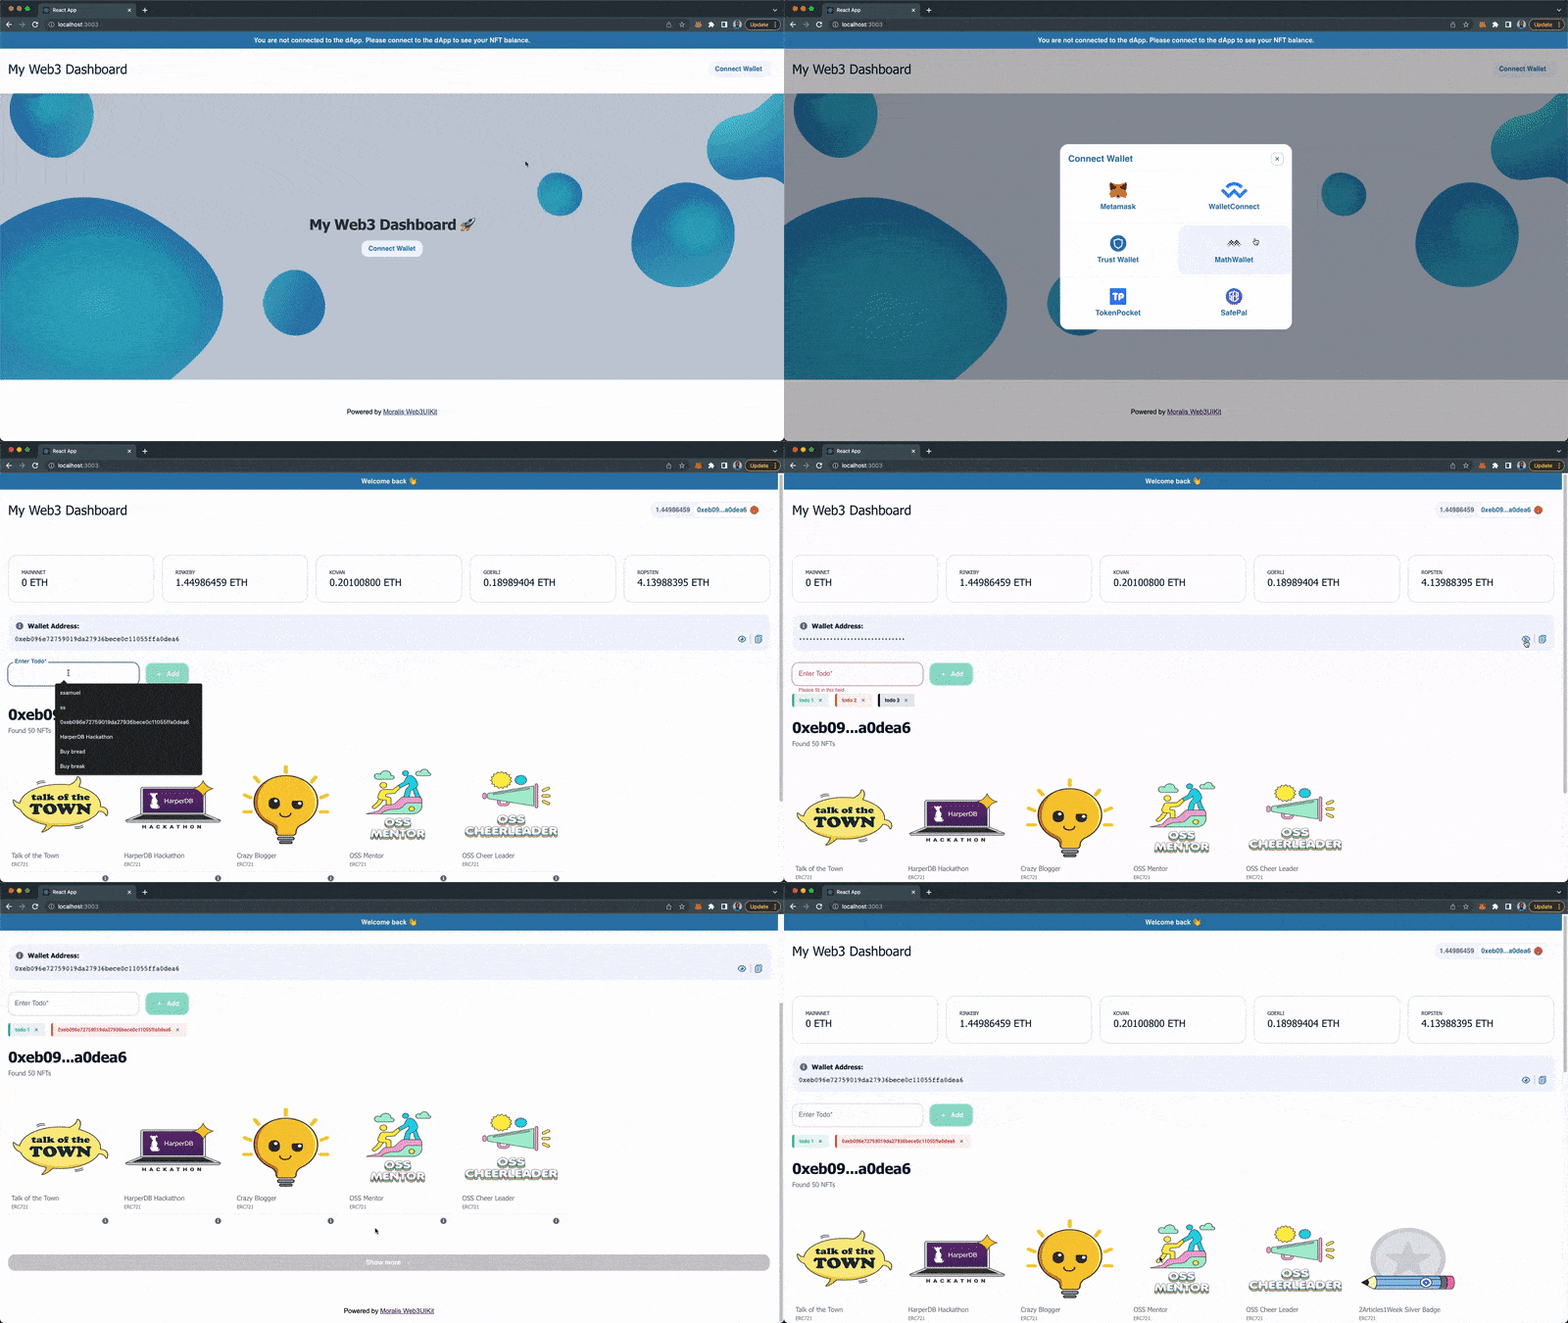
下面是我们将在本教程中构建的 dApp 仪表板的演示视频:
![https://hicoldcat.oss-cn-hangzhou.aliyuncs.com/img/202209091708244.gif https://hicoldcat.oss-cn-hangzhou.aliyuncs.com/img/202209091708244.gif]()
您还可以在此处查看我们正在构建的实时版本。
什么是 Web3UI 工具包?
![Moralis Web3UI Kit 是第一个用于开发 dApp 前端的 web3 前端库 https://hicoldcat.oss-cn-hangzhou.aliyuncs.com/img/20220912094825.png]()
Web3UI Kit 是一个开源的、轻量级的、可重用的 web3 UI 组件。它由Moralis团队开发和维护。它类似于 Web2 UI 组件库、Chakra UI和Material UI,但功能更多。
Web3UI 工具包组件
Moralis Web3UI Kit 提供了一个易于使用的用户界面组件,可以使您的 dApp 开发更快。
下面是我们将用于构建 web3 仪表板的一些 Web3UI 工具包:
1.BannerStrip
Web3UI<BannerStrip />是一个顶部导航组件,可用于向用户显示重要通知。
![https://hicoldcat.oss-cn-hangzhou.aliyuncs.com/img/202209091705477.gif https://hicoldcat.oss-cn-hangzhou.aliyuncs.com/img/202209091705477.gif]()
2.NFTBalance
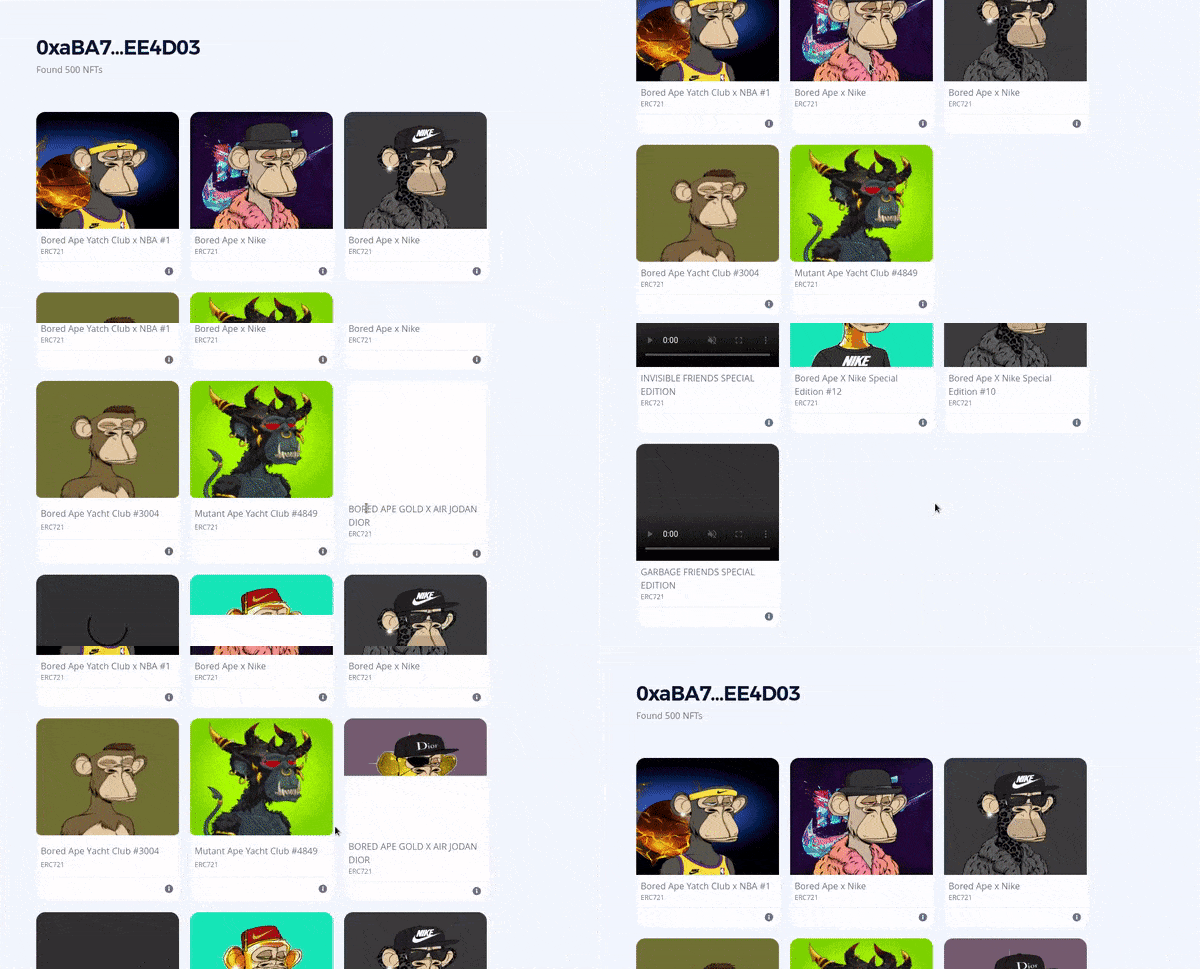
Web3UI<NFTBalance />是一个 UI 组件,用于获取并显示指定区块链上特定地址拥有的所有 NFT。
![https://hicoldcat.oss-cn-hangzhou.aliyuncs.com/img/202209091707787.gif https://hicoldcat.oss-cn-hangzhou.aliyuncs.com/img/202209091707787.gif]()
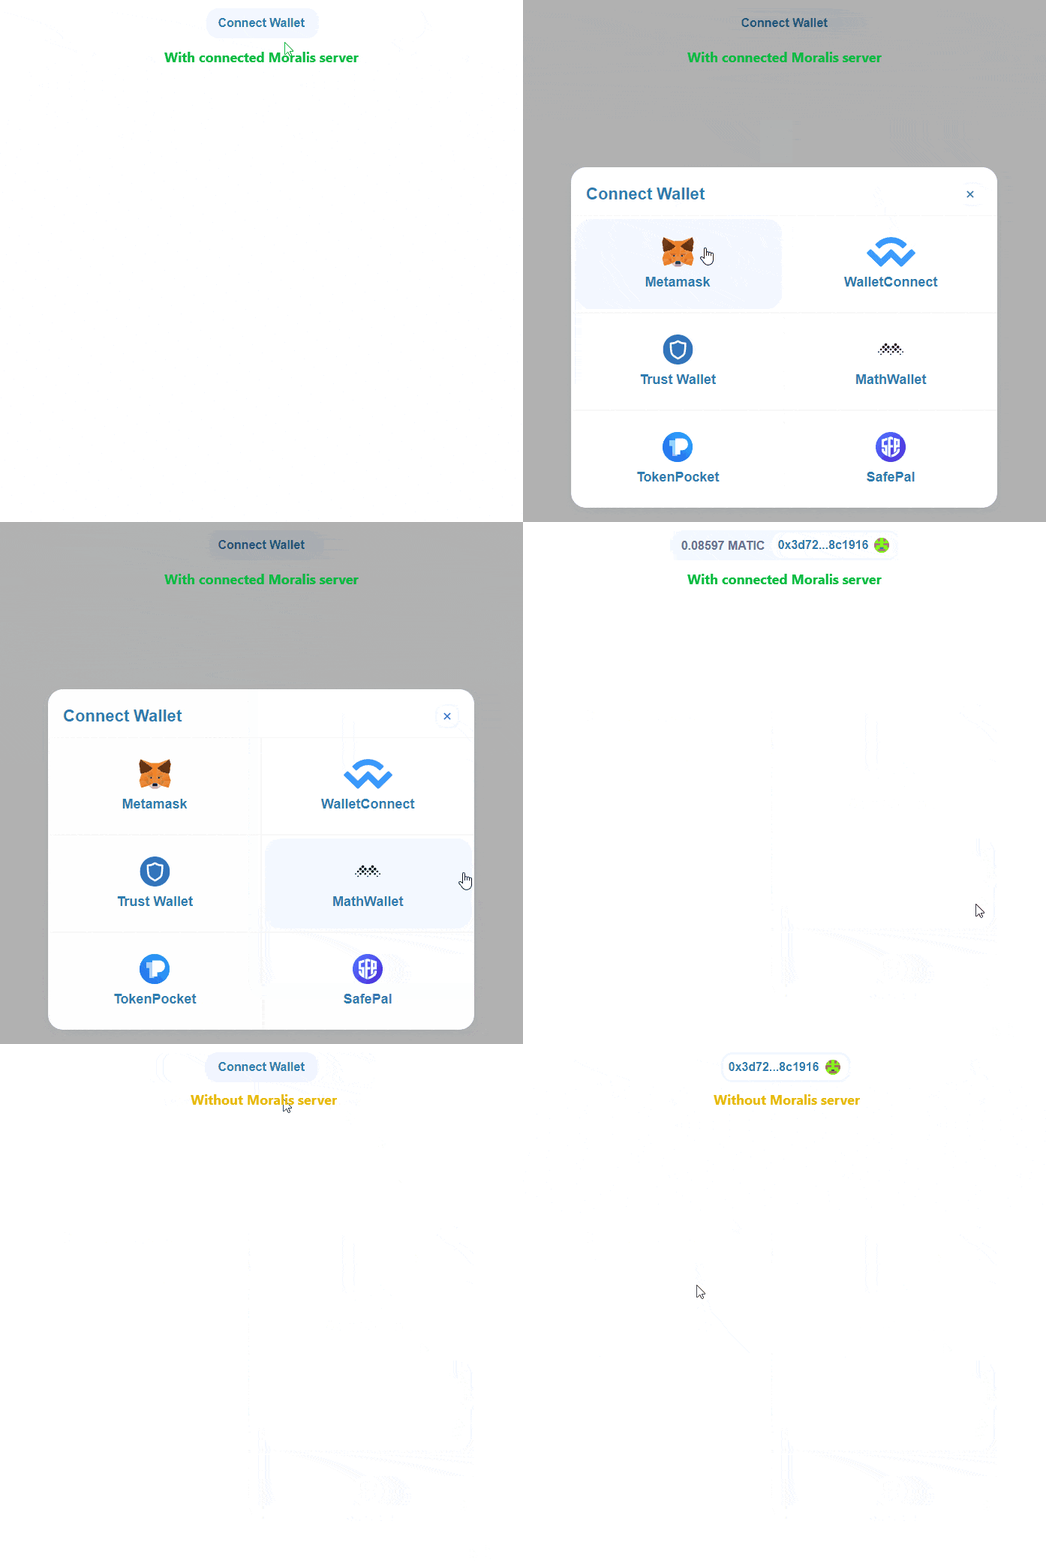
Web3UI<ConnectButton />是一个身份验证按钮,允许用户将他们的钱包与我们的 dApp 连接或断开连接。Moralis 将在后台处理所有身份验证逻辑。
![https://hicoldcat.oss-cn-hangzhou.aliyuncs.com/img/202209091707496.gif https://hicoldcat.oss-cn-hangzhou.aliyuncs.com/img/202209091707496.gif]()
4.useNotification
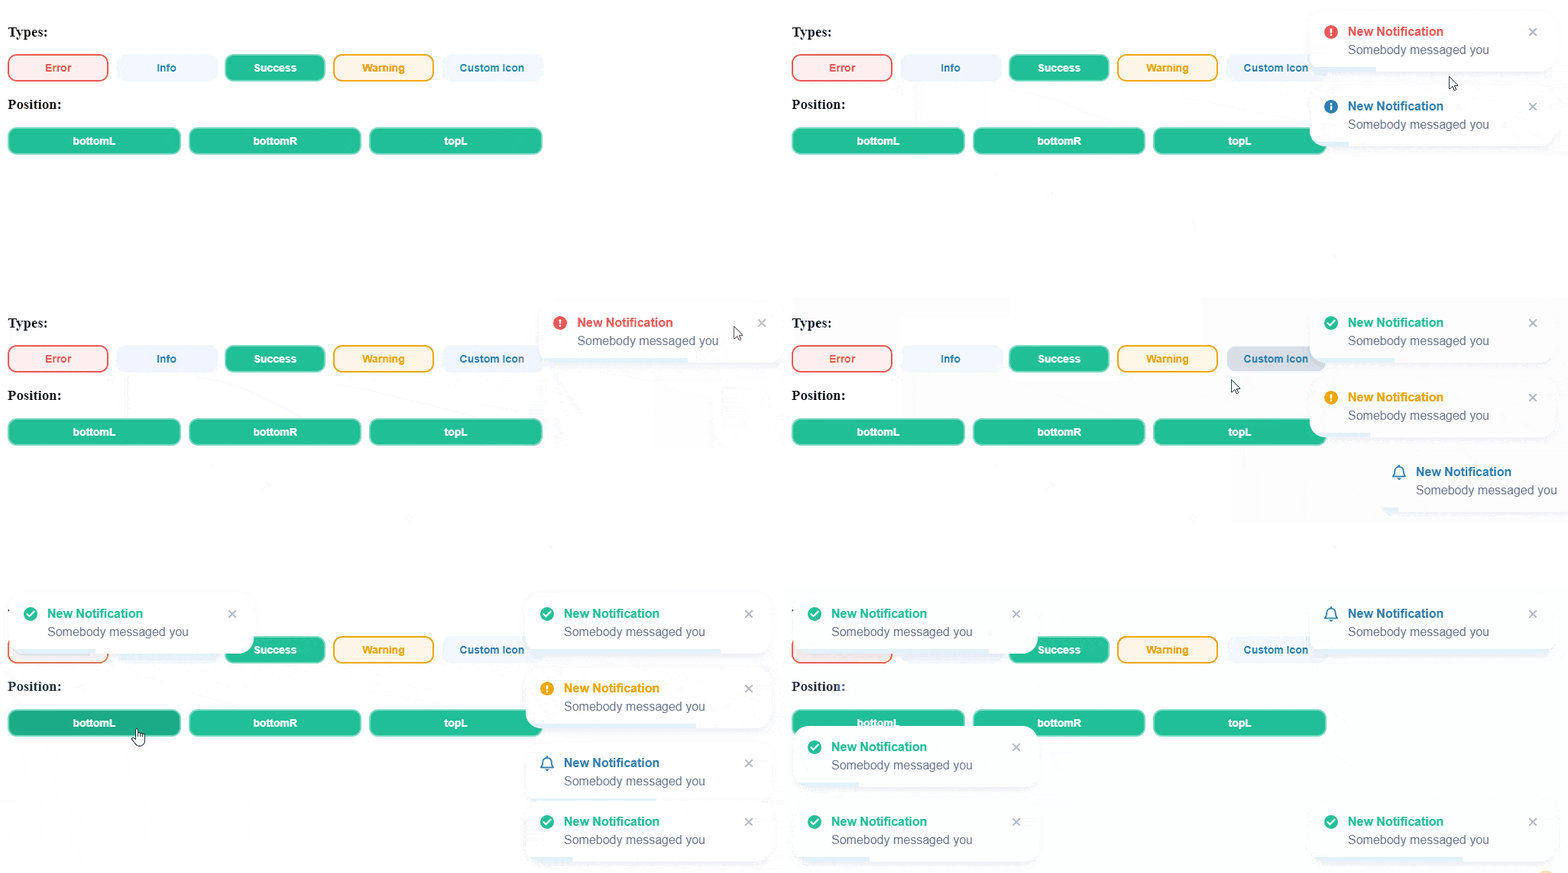
当我们的 dApp 中发生事件或操作时,Web3UIuseNotification()挂钩可用于通过<Notification />组件向用户发出和显示新通知。
![https://hicoldcat.oss-cn-hangzhou.aliyuncs.com/img/202209091708034.gif https://hicoldcat.oss-cn-hangzhou.aliyuncs.com/img/202209091708034.gif]()
Web3UI<Widget />组件是一个可用于显示数据集标签及其值的框。
![https://hicoldcat.oss-cn-hangzhou.aliyuncs.com/img/202209091709597.gif https://hicoldcat.oss-cn-hangzhou.aliyuncs.com/img/202209091709597.gif]()
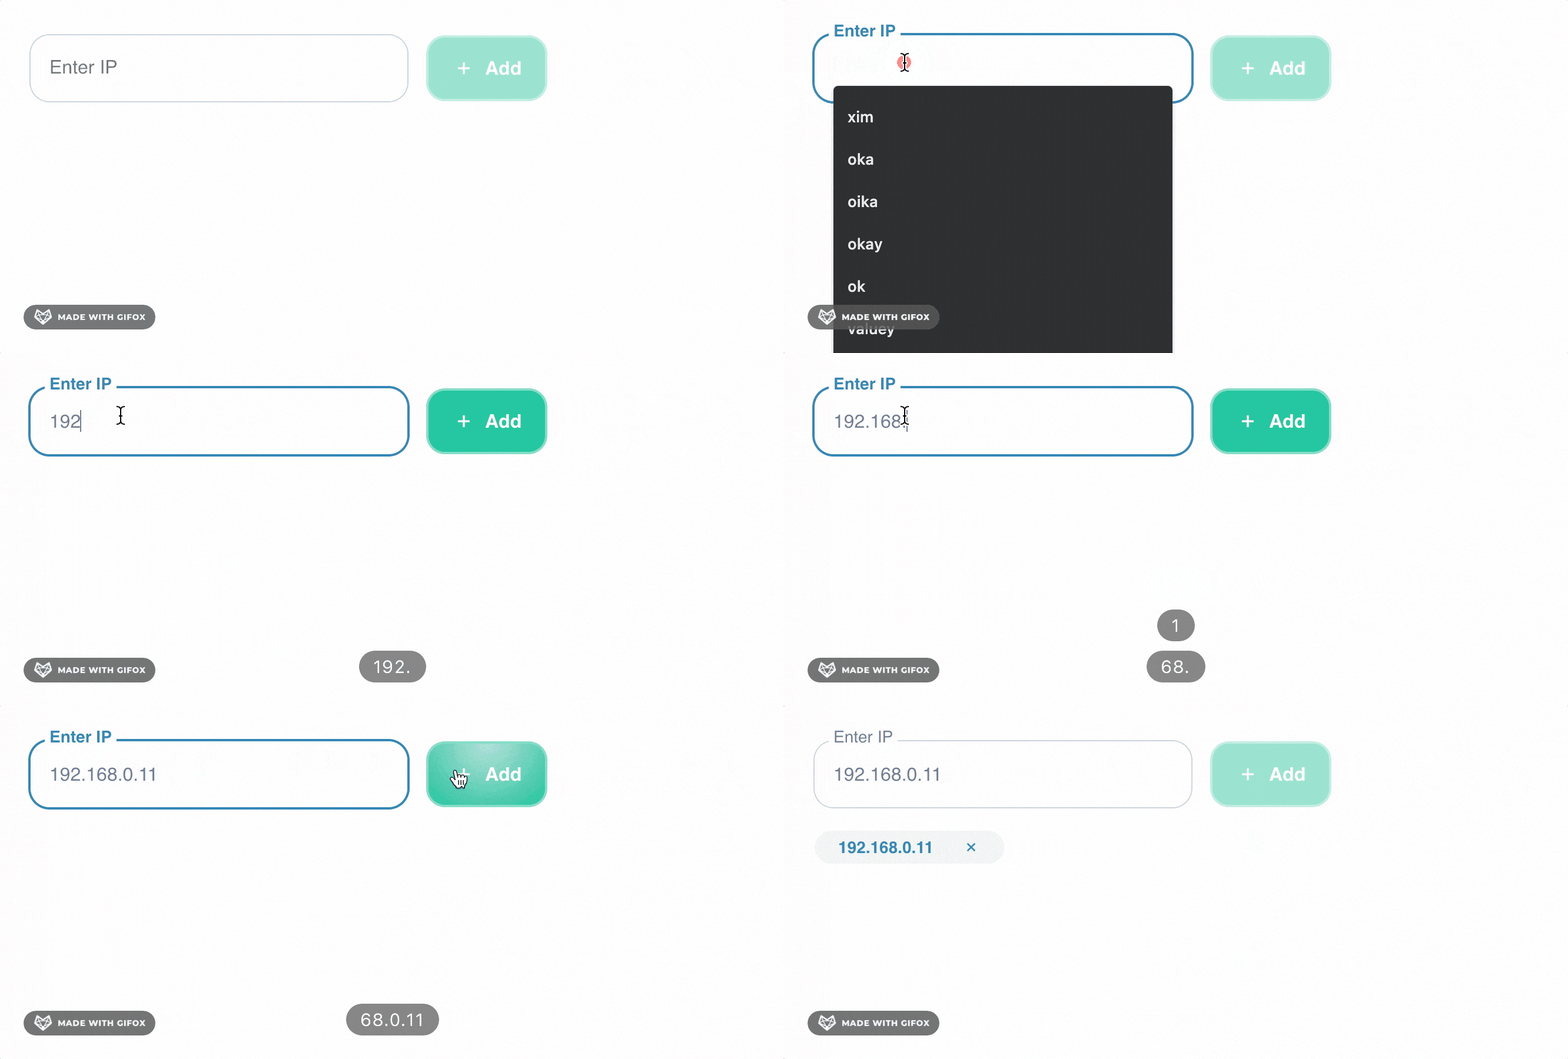
6.Todo
Web3UI Kit 提供了一个<Todo />列表 UI 组件,具有开箱即用的 CRUD 功能。只需几行代码,您就可以在 dApp 中实现功能性待办事项列表。
![https://hicoldcat.oss-cn-hangzhou.aliyuncs.com/img/202209091709532.gif https://hicoldcat.oss-cn-hangzhou.aliyuncs.com/img/202209091709532.gif]()
7.Hero
Web3UI 套件<Hero>组件可用于为 dApp 登录页面快速创建英雄部分。
![https://hicoldcat.oss-cn-hangzhou.aliyuncs.com/img/202209091710975.png https://hicoldcat.oss-cn-hangzhou.aliyuncs.com/img/202209091710975.png]()
8.Credentials
Web3UI<Credentials />组件可用于切换前端敏感数据的可见性,例如密码或令牌。
![https://hicoldcat.oss-cn-hangzhou.aliyuncs.com/img/202209091710347.gif https://hicoldcat.oss-cn-hangzhou.aliyuncs.com/img/202209091710347.gif]()
9.Typography
您可以使用 Web3UI Kit<Typography />组件改进 dApp 的字体。
![https://hicoldcat.oss-cn-hangzhou.aliyuncs.com/img/202209091710065.png https://hicoldcat.oss-cn-hangzhou.aliyuncs.com/img/202209091710065.png]()
您可以在此处查看完整的 Web3UI Kit 组件列表。
构建 dApp 仪表板
在本节中,我们将结合上面讨论过的所有 Web3UI Kit 组件来构建我们的 web3 仪表板。
在本节中,我们将结合上面讨论过的所有 Web3UI Kit 组件来构建我们的 web3 仪表板。
第 1 步 - 在 React 中安装 Moralis Web3UI 工具包
运行以下命令以使用 yarn 和Create React App (CRA)创建React应用程序:
1
|
yarn create react-app my-web3-dashboard
|
使用以下命令导航到新创建的文件夹:
接下来,运行以下命令安装Moralis React SDK和Web3UI Kit:
1
|
yarn add moralis react-moralis web3uikit
|
使用以下命令启动您的 React 服务器:
第 2 步 - 在 React 中初始化 Moralis SDK
设置 Moralis 服务器并安装 Moralis SDK(见此处)后,下一步是通过 Moralis SDK 在我们的 React 应用程序和 Moralis 服务器之间建立连接。
在项目的根目录下创建一个.env文件并存储 Moralis 服务器详细信息,如下所示:
1
2
|
REACT_APP_SERVER_URL=https://XXXXXX.usemoralis.com:2053/server
REACT_APP_APP_ID=XXXXXXXXXXXXXXXXXXXXXXXXXXXXXX
|
用您的 Moralis 凭证替换占位符。接下来,我们需要在更新src/.env文件后重新启动我们的服务器。
使用下面的快捷键停止您的服务器:
使用以下命令再次启动您的服务器:
接下来,我们将App.js使用以下代码更新我们的文件:
 1
 2
 3
 4
 5
 6
 7
 8
 9
10
11
12
13
14
15
16
17
18
|
import { NotificationProvider } from "web3uikit";
import { MoralisProvider } from "react-moralis";
import { Dashboard } from "./component/Dashboard";

function App() {
  return (
    <MoralisProvider
      serverUrl={process.env.REACT_APP_MORALIS_SERVER_URL}
      appId={process.env.REACT_APP_MORALIS_APP_ID}
    >
      <NotificationProvider>
        <Dashboard />
      </NotificationProvider>
    </MoralisProvider>
  );
}

export default App;
|
在这一步中,我们将创建连接钱包组件,以便我们可以使用我们的钱包(例如 Metamask)登录仪表板。
在您的src文件夹中:
- 创建一个新
components文件夹
- 在文件夹中,使用以下代码
components创建一个新文件:ConnectWallet.jsx
 1
 2
 3
 4
 5
 6
 7
 8
 9
10
11
12
13
14
15
16
|
import React from "react";
import { ConnectButton, Hero } from "web3uikit";

export const ConnectWallet = () => {
  return (
    <section className='not-connected'>
      <Hero
        backgroundURL='https://moralis.io/wp-content/uploads/2021/06/blue-blob-background-2.svg'
        title='My Web3 Dashboard 🚀'
        height='70vh'
      >
        <ConnectButton signingMessage='Connect wallet' />
      </Hero>
    </section>
  );
};
|
在上面的代码中,我们渲染了<Hero />和<ConnectButton />组件。
这是<ConnectWallet />我们上面使用的组件的输出:
![https://hicoldcat.oss-cn-hangzhou.aliyuncs.com/img/202209091712561.png https://hicoldcat.oss-cn-hangzhou.aliyuncs.com/img/202209091712561.png]()
现在,用户可以连接他们的任何数字钱包:
![https://hicoldcat.oss-cn-hangzhou.aliyuncs.com/img/202209091713731.png https://hicoldcat.oss-cn-hangzhou.aliyuncs.com/img/202209091713731.png]()
第 4 步 - 构建 dApp 仪表板
在这一步中,我们将构建显示以下内容的仪表板组件:
主网、Kovan、Rinkeby、Goerli 和 Ropsten 测试网上已连接用户的余额
显示已连接用户的钱包地址的切换卡
用于添加和删除任务的待办事项列表
连接用户拥有的 NFT
从您的components文件夹中:
Dashboard.jsx使用以下代码创建一个新文件:
  1
  2
  3
  4
  5
  6
  7
  8
  9
 10
 11
 12
 13
 14
 15
 16
 17
 18
 19
 20
 21
 22
 23
 24
 25
 26
 27
 28
 29
 30
 31
 32
 33
 34
 35
 36
 37
 38
 39
 40
 41
 42
 43
 44
 45
 46
 47
 48
 49
 50
 51
 52
 53
 54
 55
 56
 57
 58
 59
 60
 61
 62
 63
 64
 65
 66
 67
 68
 69
 70
 71
 72
 73
 74
 75
 76
 77
 78
 79
 80
 81
 82
 83
 84
 85
 86
 87
 88
 89
 90
 91
 92
 93
 94
 95
 96
 97
 98
 99
100
101
102
103
104
105
106
107
108
109
110
111
112
113
114
115
116
117
118
119
120
121
122
123
124
125
126
127
128
129
130
131
132
133
134
135
136
137
138
139
140
141
142
143
144
145
146
147
148
149
150
151
152
153
154
155
156
157
158
159
160
161
162
163
164
165
166
167
168
169
170
171
172
173
174
|
import Moralis from "moralis";
import React, { useEffect } from "react";
import { useMoralis, useMoralisWeb3Api } from "react-moralis";
import {
  BannerStrip,
  NFTBalance,
  ConnectButton,
  useNotification,
  Widget,
  Todo,
  Credentials,
  Typography,
} from "web3uikit";
import { ConnectWallet } from "./ConnectWallet";

export const Dashboard = () => {
  const dispatch = useNotification();
  const Web3Api = useMoralisWeb3Api();
  const { isAuthenticated, user } = useMoralis();
  // Current user's wallet address
  const userAddress = user?.get("ethAddress");

  // Token balance of the current user
  const [mainnetBalance, setMainnetBalance] = React.useState("0");
  const [kovanBalance, setKovanBalance] = React.useState("0");
  const [rinkebyBalance, setRinkebyBalance] = React.useState("0");
  const [goerliBalance, setGoerliBalance] = React.useState("0");
  const [ropstenBalance, setRopstenBalance] = React.useState("0");

  // Notification handler
  const handleNewNotification = ({ type, title, message, position }) => {
    dispatch({
      type: type || "info",
      message: message || "",
      title: title || "New Notification",
      position: position || "topR",
    });
  };

  // Get the balance of the current user
  const fetchTokenBalances = async (chain) => {
    const options = { chain, address: userAddress };
    const result = await Web3Api.account.getNativeBalance(options);
    return result.balance;
  };

  // Fetch all token balances of the current user
  const fetchBalances = async () => {
    const balances = await Promise.all([
      fetchTokenBalances("mainnet"),
      fetchTokenBalances("kovan"),
      fetchTokenBalances("rinkeby"),
      fetchTokenBalances("goerli"),
      fetchTokenBalances("ropsten"),
    ]);

    // Balance of the current user on each chain
    const mainnetBalance = balances[0];
    const kovanBalance = balances[1];
    const rinkebyBalance = balances[2];
    const goerliBalance = balances[3];
    const ropstenBalance = balances[4];

    // Convert the balance from Wei to Ether
    const mainnetBalanceEther = Moralis.Units.FromWei(mainnetBalance);
    const kovanBalanceEther = Moralis.Units.FromWei(kovanBalance);
    const rinkebyBalanceEther = Moralis.Units.FromWei(rinkebyBalance);
    const goerliBalanceEther = Moralis.Units.FromWei(goerliBalance);
    const ropstenBalanceEther = Moralis.Units.FromWei(ropstenBalance);

    // Set the ETH balance of the current user
    setMainnetBalance(mainnetBalanceEther);
    setKovanBalance(kovanBalanceEther);
    setRinkebyBalance(rinkebyBalanceEther);
    setGoerliBalance(goerliBalanceEther);
    setRopstenBalance(ropstenBalanceEther);
  };

  useEffect(() => {
    if (isAuthenticated) {
      // Notification object
      const notificationData = {
        types: "info",
        title: "Wallet Connected 🤝",
        position: "bottomR",
      };

      // Show notification
      handleNewNotification(notificationData);

      // Fetches all token balances of the current user
      fetchBalances();
    }
  }, [isAuthenticated]);

  return (
    <React.Fragment>
      <header>
        {/* Dapp Header Banner */}
        <BannerStrip
          text={
            isAuthenticated
              ? "Welcome back 👋"
              : "You are not connected to the dApp. Please connect to the dApp to see your NFT balance."
          }
          height='40px'
          className='dapp-header-banner'
        />

        {/* Dapp Authentication */}
        <section className='container topnav'>
          <Typography variant='h2'>My Web3 Dashboard</Typography>
          <ConnectButton signingMessage='Connect wallet' />
        </section>
      </header>
      <main>
        {isAuthenticated ? (
          <section className='container'>
            {/* Dapp Balance Widget */}
            <section className='wallet-balance-widget'>
              <Widget
                title='MAINNNET'
                info={`${mainnetBalance.slice(0, 10)} ETH`}
              />
              <Widget
                title='RINKEBY'
                info={`${rinkebyBalance.slice(0, 10)} ETH`}
              />
              <Widget title='KOVAN' info={`${kovanBalance.slice(0, 10)} ETH`} />
              <Widget
                title='GOERLI'
                info={`${goerliBalance.slice(0, 10)} ETH`}
              />
              <Widget
                title='ROPSTEN'
                info={`${ropstenBalance.slice(0, 10)} ETH`}
              />
            </section>

            {/* Wallet Address  */}
            <section className='my-secret-credential'>
              <Credentials
                icon='info'
                text={userAddress}
                title='Wallet Address:'
              />
            </section>

            {/* Dapp Todo */}
            <section className='todo-container'>
              <Todo
                label='Enter IP'
                onChange={function noRefCheck() {}}
                todos={[]}
              />
            </section>

            {/* Dapp NFT Owned by user */}
            <section className='my-nfts-section'>
              <NFTBalance address={userAddress} chain='rinkeby' />
            </section>
          </section>
        ) : (
          // Dapp Connect Wallet
          <ConnectWallet />
        )}
      </main>

      <footer className='container'>
        Powered by <a href='https://moralis.io'>Moralis Web3UIKit</a>
      </footer>
    </React.Fragment>
  );
};
|
在上面的代码中:
我们检查钱包是否与 MoralisisAuthenticated状态相关联。
index.css用以下代码行替换您的内容:
 1
 2
 3
 4
 5
 6
 7
 8
 9
10
11
12
13
14
15
16
17
18
19
20
21
22
23
24
25
26
27
28
29
30
31
32
33
34
35
36
37
38
39
40
41
42
43
44
45
46
47
48
49
50
51
52
53
54
|
* {
  padding: 0;
  margin: 0;
  box-sizing: border-box;
}

body {
  font-family: Arial;
}

.container {
  padding: 20px;
}

.not-connected > * > h1 {
  z-index: 0 !important;
}

.topnav {
  display: flex;
  justify-content: space-between;
  align-items: center;
  margin-top: 50px;
  margin-bottom: 20px;
}

.wallet-balance-widget {
  display: flex;
  gap: 20px;
  margin: 30px 0;
}

.todo-container {
  margin: 30px 0;
  width: 100%;
}

.todo-container section {
  padding: 0;
}

/* MY NFTS SECTION */
.my-nfts-section > section {
  display: flex;
  flex-wrap: wrap;
  justify-content: center;
  align-items: center;
  margin: 30px 0;
}

footer {
  text-align: center;
  margin-top: 50px;
}
|
连接钱包后,我们的 dApp 仪表板应如下所示:
![https://hicoldcat.oss-cn-hangzhou.aliyuncs.com/img/202209091714600.png https://hicoldcat.oss-cn-hangzhou.aliyuncs.com/img/202209091714600.png]()
你成功了👏
我们的 dApp 仪表板已准备好代码;你可以继续连接你的钱包以访问仪表板或按照它的工作原理。
您可以在此处找到我们教程的完整 React 源代码。
结论
本文演示了如何使用 Moralis Web3UIKit 安装和构建您的 dApp 前端。
Web3UIKit 是一个用于构建 Web3 项目界面的开源前端库,由Moralis维护。您可以从这里的官方存储库为 Web3UI 工具包做出贡献。
![https://hicoldcat.oss-cn-hangzhou.aliyuncs.com/img/my.png https://hicoldcat.oss-cn-hangzhou.aliyuncs.com/img/my.png]()


